Carrot Cake Cookies w/ Cream Cheese Glaze (GF + V)

I absolutely love Easter. Everything about it- the aisles at Harris Teeter filled with egg dyeing kits and chocolate bunnies, the little girls wearing white, wide brimmed Easter hats, and the reverence of the holiday. Our debts are paid, we’ve been set free!

Last year at this time I was going crazy trying to prepare a feast for members of both sides of our family who were visiting. While I absolutely love hosting, our house all of a sudden seemed VERY small. And I still haven’t quite gotten the hang of chatting while making sure the honey ham, potatoes, and gravy would all be hot at the same time.

I had a lot of relief last year by making many of my sides in advance. Made-in-advance meals are essential. But this year, we elected not to host since our house is currently reminiscent of a large storage unit. We are moving in 2 weeks, and figured we’d keep Easter low-key this year. We are going to a potluck at a friend’s house instead.

I knew I wanted to bring something sweet, but also wholesome. The idea of carrot cake crossed my mind, but who has time (in between boxing up the linens) to bake an entire cake? And besides, I find most times I go to parties and no one wants to be the person to cut into the cake, let alone eat a whole slice with so much other good food around.

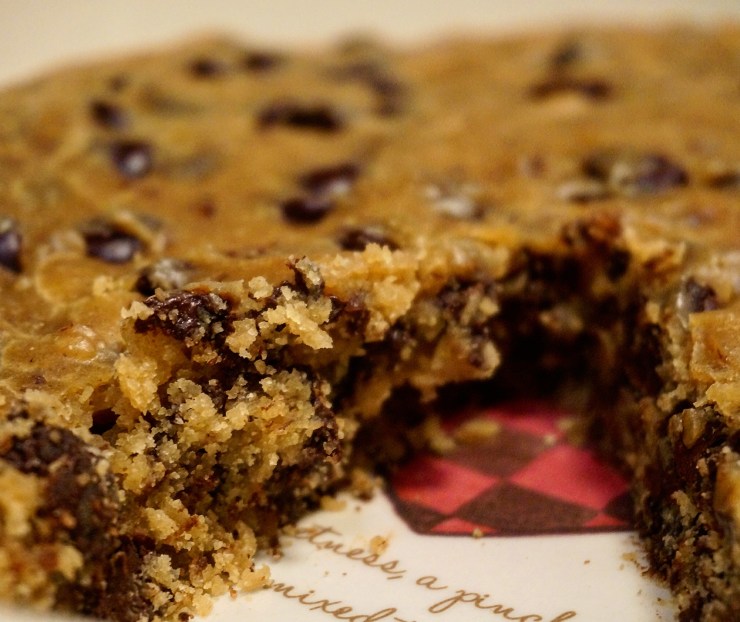
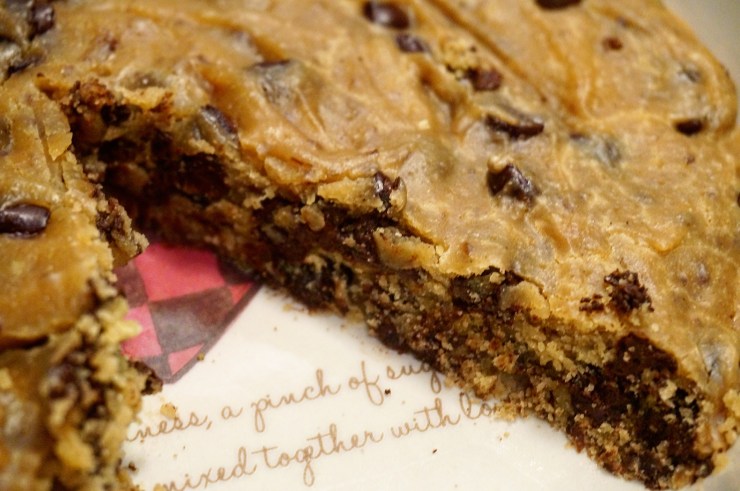
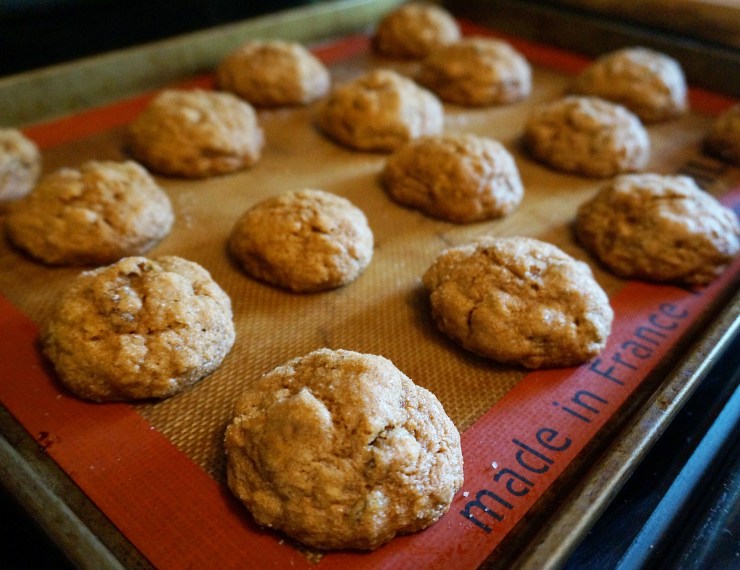
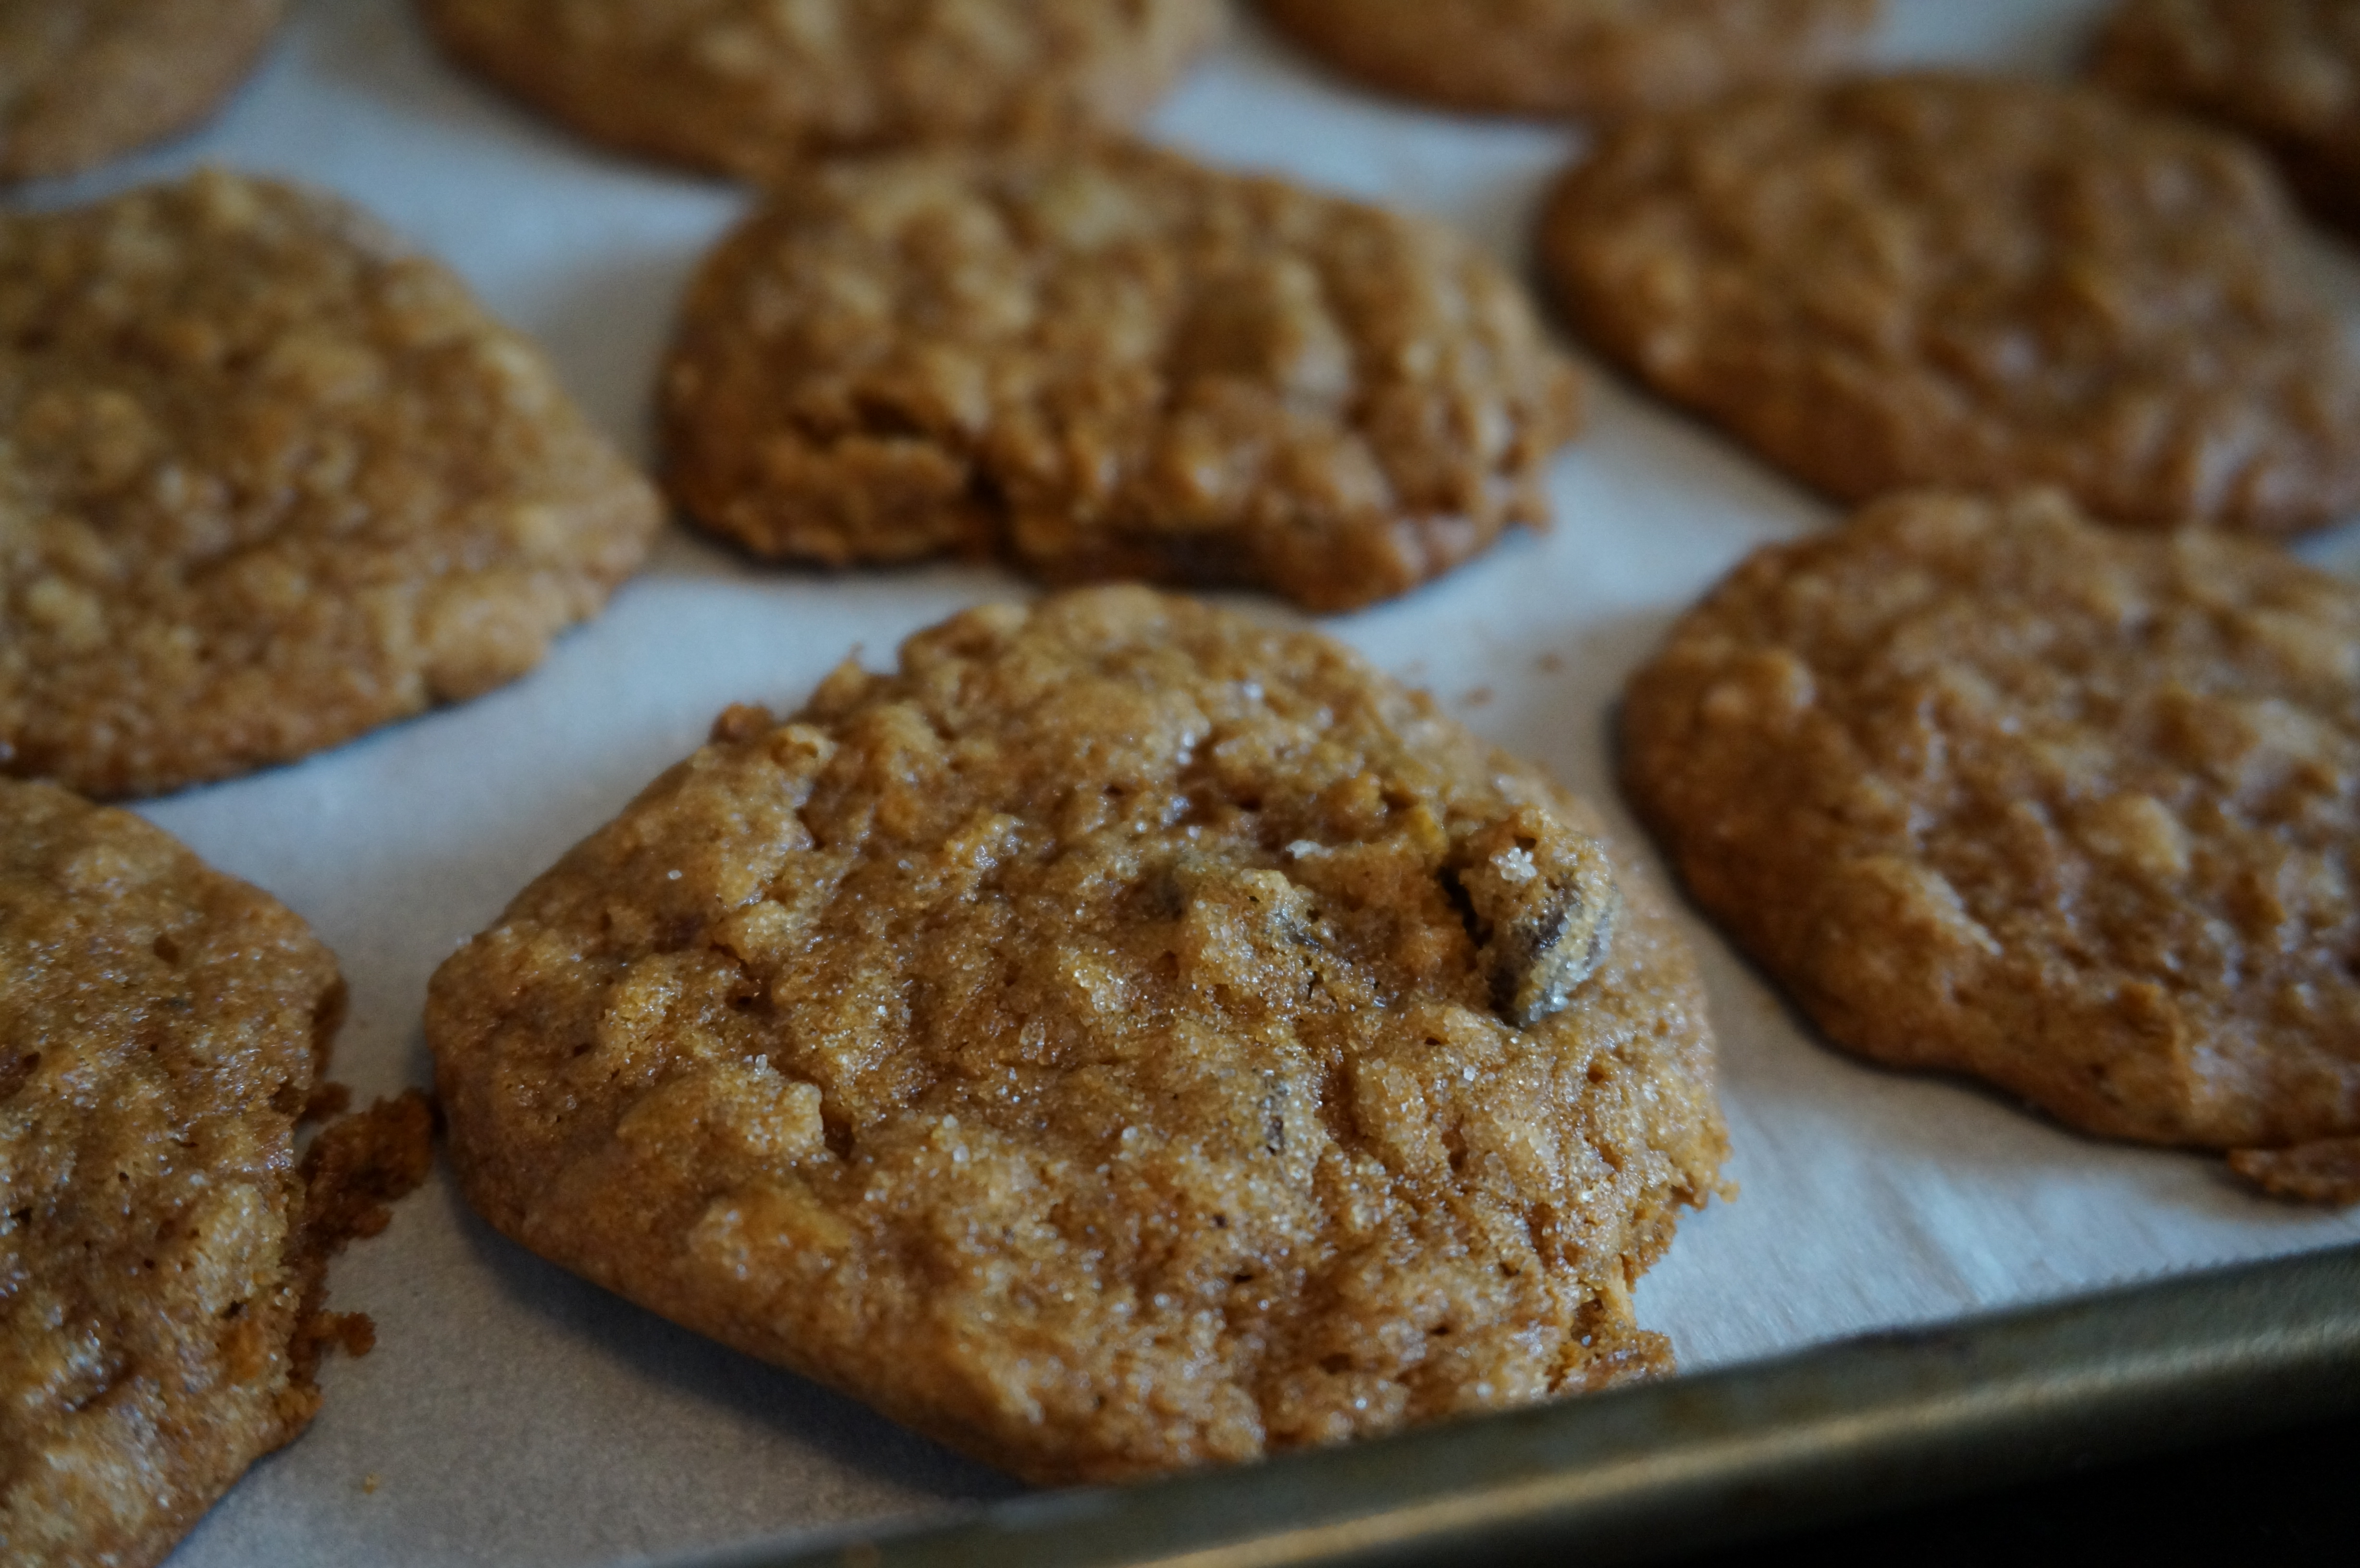
Enter carrot cake cookies.

Carrot Cake Cookies with Cream Cheese Glaze

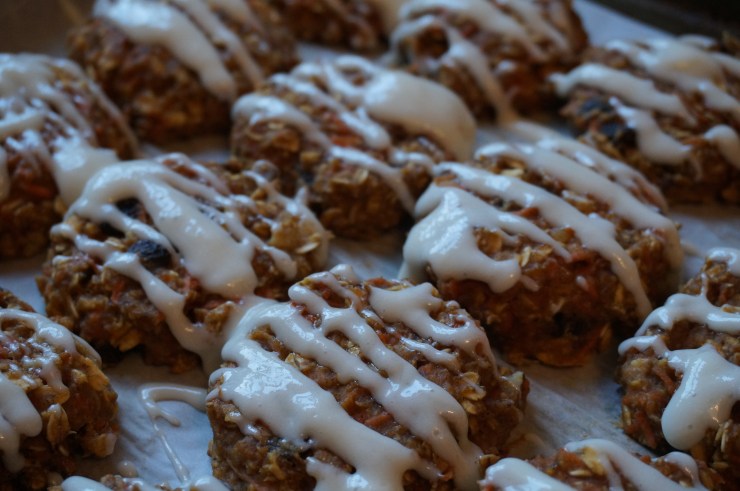
Inspired by a recipe from Iowa Girl Eats, these carrot cake cookies are wholesome enough to eat for breakfast, I swear! Minimal oil, no eggs, no butter. Oat flour and flax for staying power, and grated carrots, raisins and chopped walnuts to get that carrot cake texture. I saved about half the batch to freeze for grab n’ go breakfasts at work. Does that make me a meal prepper?

These can also easily be gluten free (using GF oats) and vegan (using almond milk and without the glaze).

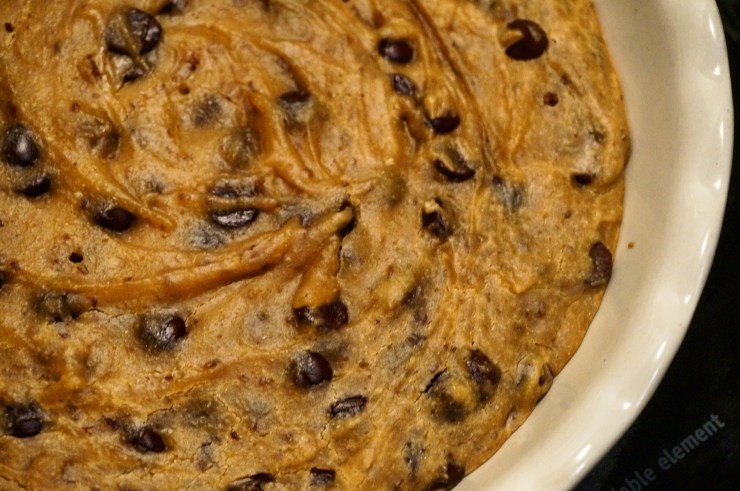
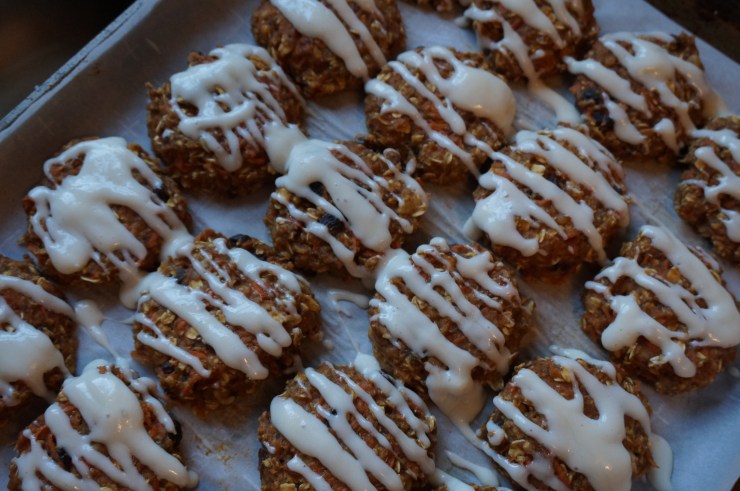
To make these a little more “desserty” (and also more like true carrot cake), I whipped up a cream cheese glaze to drizzle over the cookies when ready to serve. The glaze will harden slightly as the cookies continue to cool, but will stay drizzly, not like the gross frosted molasses cookies you buy in a box.

And you will probably have leftover glaze, which gives you complete license to put it on top of your cereal, dip graham crackers, or just lick it out of the bowl.

 .           .                   


These are husband and kid-approved. Well, I don’t really know if they’re kid-approved, since we don’t have any kids, but just trust me on that one.

DSC04964.jpg

I promise my next recipe will not include anything carrot.

But in the meantime, enjoy every bite! Recipe below. Happy Easter!

Carrot Cake Cookies w/ Cream Cheese Glaze (GF + V)
Recipe Type: Cookie, Breakfast
Cuisine: Healthy, Gluten Free, Vegan
Author: Claire McCormick of “Claire Tastes”
Prep time:
Cook time:
Total time:
Serves: 12
Celebrate Easter this year with a simplified version of a just-as-tasty carrot cake! These cookies are made with wholesome ingredients and can be made vegan with just a few subs. Make ahead and freeze for an easy, on-the-go breakfast!
Ingredients
  • 3 cups GF old fashioned oats, divided
  • 1 cup GF flour (or almond flour)
  • 1/4 cup ground flaxseed
  • 1 tsp cinnamon
  • 1/2 tsp ground ginger
  • 1/2 tsp baking soda
  • 1/2 tsp salt
  • 2 very ripe mashed bananas
  • 1/2 cup unsweetened applesauce
  • 1/4 cup honey
  • 2 tbsp maple syrup
  • 1/4 cup veg oil
  • 1/4 cup milk (almond milk if vegan)
  • 3 large carrots
  • 1/2 cup chopped walnuts
  • 1/2 cup raisins
  • For cream cheese glaze:
  • 2 oz cream cheese, softened
  • 1 cup powdered sugar
  • 1 tsp vanilla
  • 1 tbsp almond milk
Instructions
  1. Preheat oven to 350. In a food processor, pulse 1 cup oats until a fine powder.
  2. In a large stand mixer, combine the oats, oat flour and GF flour, flaxseed, cinnamon, ginger, baking soda, and salt. Mix to combine.
  3. In the same food processor, use grating function to grate carrots finely. Set aside.
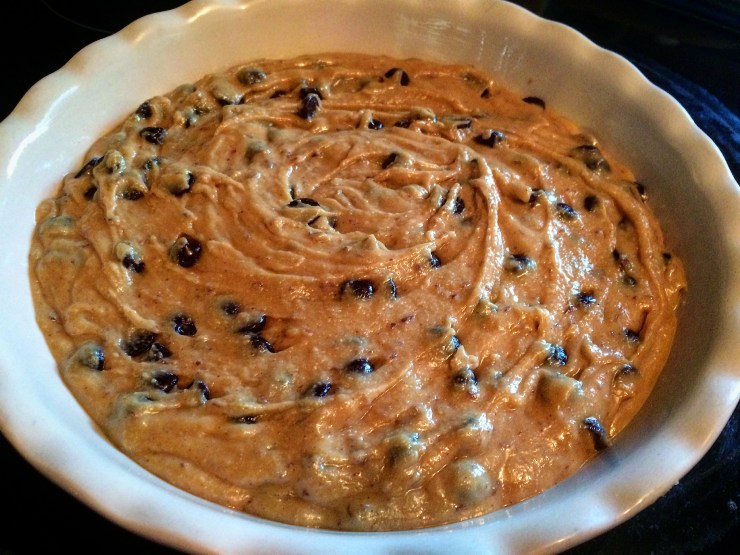
  4. In a separate bowl, whisk banana, applesauce, honey, maple syrup, oil, and milk. Stir in carrots, walnuts, and raisins. If mixture is too runny, add a little more flour.
  5. Spoon onto prepared baking sheet with 1/4 cup scoop. Bake 8-10 mins until golden brown on top. Cookies will still be soft.
  6. Allow to cool completely.
  7. While cooling, prepare glaze. Beat together cream cheese, sugar, vanilla, and milk until runny. Drizzle onto cooled cookies.
  8. Note: To make ahead, wrap individual cookies (without glaze) in plastic wrap and freeze. Microwave 10-20 sec in the morning for a wholesome breakfast!

He is Risen!

Peanut Butter Tahini Cookie Cake- Vegan and GF!

Why hellooooo peanut butter and chocolate gooeyness and deliciousness. You are exactly what I needed tonight.

Peanut Butter Tahini Cookie Cake

Does this need any other introduction? I created this recipe based on one from Init4thelongrun, adapting it to make it gluten-free and based on ingredients I already had. The main swaps I made were natural Jif PB (yes, it is vegan- I did my research!), tahini to supplement the peanut butter, and stevia instead of coconut sugar. I also subbed out whole wheat flour for a gluten-free flour, since I was making these for small group and we have some dietary restrictions in our group!

I love trying out new ways to bake things to appeal to larger groups, and I’ve found that whether you are vegan, gluten-free, or a cow-and-bread-lover, many recipes (especially desserts!) can appeal to a crowd!

Peanut Butter Tahini Cookie Cake
Peanut Butter Tahini Cookie Cake- Vegan and GF!
Recipe Type: Dessert
Cuisine: Cookie, Cake
Author: Claire McCormick of “Claire Tastes”
Prep time:
Cook time:
Total time:
Serves: 8
Vegan and GF. This does not make it healthy. Just try it.
Ingredients
  • 1 flax egg (1 T flax meal + 3 T warm water)
  • 1/2 cup natural peanut or almond butter
  • 1/3 cup tahini
  • 1/4 cup almond milk
  • 1 tsp vanilla
  • 1/3 cup stevia
  • 1 cup gluten free flour
  • 1/2 tsp baking powder
  • dash of salt (about a quarter tsp)
  • 3/4 cup (or more) vegan chocolate chips (I used Enjoy Life)
Instructions
  1. Preheat oven to 350 deg.
  2. In a small bowl, whisk together flax egg through stevia.
  3. In a medium bowl, whisk together flour, baking powder, and salt. Slowly sift into wet ingredients.
  4. Grease an 8″ circular pan and pour cookie dough into pan. Top with more chocolate chips if desired.
  5. Bake at 350 deg for 25 mins or until cooked through.
  6. Cool cake before slicing and devouring.

The other nice thing about this cookie cake is that it has minimal ingredients which means less clean-up. I dirtied two mixing bowls and used a dump-and-stir method to mix the wet and dry, then spread everything in a quiche pan since I didn’t feel like rolling these into cookies! This way, everyone can sliver off a slice of “pie” however large they’d like.

You can add more or less sugar or PB, based on how sweet or nutty you’d like it. I used 1/3 cup Truvia instead of a whole 3/4 cups coconut sugar, since I knew stevia is much sweeter, so this recipe is more on the nutty side than sickeningly sweet, but I feel like it works well! Totally up to you.

img_8565

img_8581

Dig in! It’s Hump Day!

Melt-in-Your-Mouth Brown Butter Molasses Cookies

Happy Monday!

Today it was finally not 1000 degrees and 100% humidity outside. Ben and I got back from the beach on Saturday and all we wanted to do was sprawl ourselves out under the ceiling fan, it was that hot. Even with the AC blasting, you couldn’t lift a finger (let alone think about unpacking or cleaning up around the house) without breaking into a dripping sweat.

Thankfully, today was the first day it actually felt like fall is coming. While it wasn’t exactly cool outside, I was able to sit out on the patio to write this post without instantly regretting it. This time of year always brings back fond memories of back-to-school shoe and supply shopping (I could spend an entire afternoon meticulously organizing pens and pencils in the pockets of my backpack and snapping plastic dividers into binders). Which was almost as enjoyable as putting on new, white cushy socks for the first time after wearing out the ones with holes in the heels!

Since I no longer get to go back-to-school-shopping, I have to get my fall fix by baking. Which is why this recipe is so appropriate for today. These chewy brown butter molasses cookies will make you almost believe it’s October, and they don’t even have any pumpkin spice in them! Perfect for dunking in coffee, tea, or sprinkling over a mug of vanilla ice cream, these will not disappoint.

Melt-in-Your-Mouth Brown Butter Molasses Cookies

The process of browning butter is a fairly new one to me, I think because it’s so easy for the butter to burn if you don’t watch it closely. It’s actually pretty cool how the butter goes from yellow, to greenish, to toasted brown in the process. You’ll know it’s done when it starts to give off a nutty (not burned!) aroma and looks a little like caramel.

The other part of this recipe I love is that it literally just takes two pans, a whisk and a cookie sheet. You can easily stir the dry ingredients into the saucepan you used for melting the butter, which cuts down on cleanup time! Anything to speed along the process so you can get to the TRULY important part- eating!

I highly suggest enjoying these right out of the oven, or nuking for 5-10 seconds until they’re warm.

Chewy Brown Butter Molasses Cookies
Recipe Type: Cookie, Dessert
Cuisine: Fall, Autumn
Author: Claire McCormick of “Claire Tastes”
Prep time:
Cook time:
Total time:
Serves: 2-3 dozen
Fall is coming! Brush up on your autumnal baking skills with this easy and delicious molasses cookie. Perfect for dipping in coffee or tea!
Ingredients
  • 2 cups all-purpose flour
  • ¾ cup rolled oats
  • 1 teaspoon baking soda
  • 1/2 teaspoon salt
  • 1 teaspoon cinnamon
  • 1 teaspoon nutmeg
  • 1½ sticks unsalted butter
  • 1 cup packed light brown sugar
  • ⅓ cup molasses1 large egg, whisked
  • 1/2 cup unsweetened applesauce
  • 2 teaspoons vanilla extract
  • 1 tbsp milk
  • ½ cup raisins
  • 1/4 cup chopped walnuts
  • ½ cup granulated sugar, for rolling
Instructions
  1. In a medium saucepan, melt butter on medium heat, whisking occasionally, until it begins to foam. Whisk continuously until it turns brown and has a nutty aroma (this happens quickly- make sure to watch closely to prevent burning!). Remove from heat.
  2. Stir in brown sugar, molasses, egg, applesauce, vanilla, and milk. Whisk until smooth.
  3. Whisk together flour through nutmeg. Slowly stir into the wet ingredients and mix until incorporated.
  4. Stir in raisins and walnuts. (If mixture is too wet, you can also add a little more flour!)
  5. Chill dough in refrigerator for 30 minutes.
  6. When ready to bake, preheat oven to 350.
  7. Roll dough into small balls and gently roll in sugar. Place about 2″ apart on prepared cookie sheet, then bake 11-13 minutes or until golden brown.
  8. Cool for 5 minutes before transferring to wire cooling rack.
  9. Makes 2-3 dozen, depending on size of cookies.

IMG_8482

Melt-in-your-Mouth Brown Butter Molasses Cookies

What’s your favorite fall dessert?

Whether you’re vacationing or standing in the lines at Staples, I hope you enjoy! And have a wonderful week!

Vegan, Gluten-Free Chocolate Tahini Brownies

#TGIF.

Can I get an Amen?

Last night we hosted small group. Our house was packed! Almost everyone showed up minus two, plus a visiting mother-in-law. When you host a small group made up of dietitians, physical therapists and taller-than-average males, you better know that the snacks have to be good.

And when you have members who are either vegan, gluten-free, or vegetarian, you better be EXTRA creative because one can only make so many snacks that cater to so many different diets!

We be fancy. And so, I was on the hunt for a delicious yet vegan & gluten-free dessert that wouldn’t require going out to get too many extra ingredients.

I stumbled upon this recipe for sesame and sea salt dark chocolate brownies that looked perfect. No extra add-ins that no one has actually heard of, and the rest of the ingredients looked pretty standard. I’d actually been meaning to try to make something sweet that used tahini (which is basically like a less sweet PB). When I didn’t have an ingredient listed, I substituted with something else (e.g. veg oil and applesauce for coconut oil, since I don’t like the taste of it), and regular salt vs. sea salt. I also decided to throw in some extra (vegan) chocolate chunks for extra melty goodness.

The result? A hit! These were just about gone before my Guinness Cheddar Dip was even started, and when boys choose chocolate over beer, you know it must be good!

Vegan or not, I know you’ll love the taste of these fudgy double chocolate brownies. Thanks to Jodi for the inspiration for this new recipe!

Vegan, Gluten-Free Chocolate Tahini Brownies
Recipe Type: Dessert
Cuisine: Vegan, Gluten-Free
Author: Claire McCormick of “Claire Tastes”
Prep time:
Cook time:
Total time:
Serves: 12
You will NOT miss the gluten OR eggs in this fudgy, chocolatey, not-too-sweet decadent brownie! Great with a scoop of ice cream, schmear of PB or cup of decaf after dinner.
Ingredients
  • 1 cup gluten free or oat flour
  • 1/2 cup cocoa powder
  • 2 tbsp sesame seeds
  • 1/2 tsp baking powder
  • 1/4 tsp salt
  • 2 tbsp ground flax seeds
  • 1/4 cup water at room temperature
  • 1/4 cup vegetable or canola oil
  • 1/3 cup unsweetened applesauce
  • 1/4 cup maple syrup
  • 1/3 cup tahini
  • 1/2 cup vegan chocolate chunks
  • sea salt and extra sesame seeds to finish (optional)
Instructions
  1. Preheat oven to 350 deg and line a 8×8 pan with parchment paper (I used a cake pan because that was the closest in size that I had!)
  2. In medium bowl, whisk together flour, cocoa powder, sesame seeds, baking powder, and salt.
  3. In separate bowl, whisk together flax seeds and water. Stir in oil, applesauce, maple syrup, and tahini.
  4. Stir wet ingredients into dry ingredients and combine well. Stir in chocolate chunks.
  5. Batter will be very thick- spread in prepared dish and use a spatula to help the batter reach the sides.
  6. Sprinkle with sea salt (optional).
  7. Bake for 20 mins or until set around edges, then cool completely prior to slicing.
  8. Sprinkle with additional sesame seeds if desired.
Prepare batter and spread in prepared pan.
I found these gems at whole foods!
Half-used tahini!
Half-used tahini!
Fresh out of the oven, before slicing
Vegan, Gluten-Free Chocolate Tahini Brownies

We have a fun weekend planned- dinner and going to a Celtic Woman concert tomorrow night! What do you have planned?

Have a great weekend, friends!

Peanut Butter Oreo Fudge Sundae Pie

Umm, does this even need words to describe? A picture says 1000 words. Especially when it’s a picture of irresistible layers of peanut butter, oreos, chocolate pudding, and hot fudge all combined into one party-ready pie!

Peanut Butter Oreo Fudge Sundae Pie

We had our small group over last night for our annual Christmas party/white-elephant exchange and this didn’t get too much attention, mostly because we were all stuffed with vegan chili, mac and cheese, power salad, wings, and smoked salmon wraps! Not to mention meatballs and lots of cheese dip. Must I say more?

The fact is, when everyone left, I literally stood at the kitchen counter with a spoon in my hand and started scraping out all the bits of this pie to “even out the borders” where it had been cut earlier… (anyone else use this excuse?). Seconds later and I realized that I had basically eaten another full helping.

This pie must go.

Luckily, the therapy staff at work has quite a collective sweet tooth- therapist are the BEST eaters! I froze it overnight, then brought this bad boy in this morning, and it was gone by lunch. Score!

I promised the recipe to many of my co-workers, so here it is! Happy holiday partying to you and yours!

Peanut Butter Oreo Fudge Sundae Pie
Recipe Type: Dessert
Cuisine: American, Easy
Author: Claire McCormick of “Claire Tastes”
Prep time:
Total time:
Serves: 16
You will not resist this. So easy, and so easy to eat half a pan in one sitting. You’ve been warned!
Ingredients
  • 1 package chocolate pudding mix (sugar free or regular)
  • 1 package vanilla or cheesecake flavored pudding mix
  • 3 cups milk
  • 1 large tub cool whip
  • 1 package peanut butter oreos
  • 1/4 cup creamy peanut butter
  • 1 jar hot fudge sauce
Instructions
  1. Separate oreos and layer about half of them in the bottom of a large pan.
  2. Combine pudding mix in a large bowl and add milk. Whisk until thickened. Add cool whip and whisk until combined and creamy.
  3. Layer 1/2 pudding mixture on top of oreos evenly.
  4. Melt peanut butter and drizzle on top.
  5. Add another layer of oreos, reserving about 4 for the topping.
  6. Cover with remaining pudding mixture.
  7. Melt hot sauce for about 30 seconds or until it pours easily from the jar. Drizzle on top of pie, then run a knife through the top to make fun and fancy swirly designs! (Don’t overdo it- I always go one swipe too far and mess it up! No going back!).
  8. Crumble remaining oreos and add to top of pie.
  9. Freeze at least 4 hours or until ready to serve. Before serving, defrost at least 30 min before slicing into squares.
Peanut Butter Oreo Fudge Sundae Pie

Brown Butter Ginger Molasses Cookies

Brown Butter Ginger Molasses Cookies

I have a lot of pregnant friends. That may sound like a strange way to begin a post, but I promise I have a point.

I’ve never experienced my own pregnancy woes, but I imagine that things like morning sickness cannot be fun. While researching natural remedies for pregnancy-associated nausea, I came across a lot of articles that said ginger and molasses may help. Makes sense, knowing that ginger is easy on the stomach. Originally I’d planned to develop this amazingly healthy recipe that could be eaten as a breakfast… but let’s face it, since when do pregnant women need an excuse to eat dessert for breakfast?

While these ginger molasses cookies are not exactly what one would consider health food… they are pretty darn tasty! Crispy on the edges and chewy on the inside, they sort of melt in your mouth and have a slightly nutty flavor from the brown butter. Pregnant or non-pregnant, you’ll bite into one and wish you were!

Brown Butter Ginger Molasses Cookies
Recipe Type: Dessert
Author: Claire McCormick of “Claire Tastes”
Prep time:
Cook time:
Total time:
Serves: 36
They have oats in them… that makes them healthy, right?
Ingredients
  • 1 1/2 cups all-purpose flour
  • 3/4 cup + 1 tbsp rolled oats
  • 1 teaspoon baking soda
  • 1/4 teaspoon salt
  • 1 teaspoon cinnamon
  • 1 1/2 teaspoons ground ginger
  • 1 teaspoon nutmeg
  • 1 1/2 sticks unsalted butter
  • 1 cup packed light brown sugar
  • 1/3 cup molasses
  • 1 large egg
  • 2 teaspoons vanilla extract
  • 1 tbsp milk
  • 1/2 cup raisins
  • 1/2 cup granulated sugar, for rolling
Instructions
  1. Whisk together dry ingredients (flour through nutmeg).
  2. In a saucepan, melt butter on medium heat until it begins to foam. Then whisk continually to prevent burning. When the butter begins to change color and has a nutty aroma, remove from heat and pour into a large bowl. Add brown sugar and mix on low until combined.
  3. Add the molasses, egg, vanilla and milk and continue to mix until well incorporated.
  4. Add raisins and place in refrigerator for at least 20 minutes to make rolling easier.
  5. Preheat oven to 350. Line a baking pan with parchment paper or a Silpat.
  6. Using hands (you may need to wet your palms or roll in a little flour prior to rolling, as this dough is pretty sticky!), roll into balls the size of your choice. Then roll in a little sugar and place on baking sheet. I also pressed my balls down with a fork to make a “criss-cross pattern.” Just make sure that the cookies are far enough apart to prevent them from spreading into each other!
  7. Bake 11-12 minutes depending on size of cookies, or until golden brown.
  8. Cool for at least 5 minutes on pan, then remove and allow to cool on a wire cooling rack.