Lemon Balsamic Salmon w/ Rosemary & Garlic Quinoa

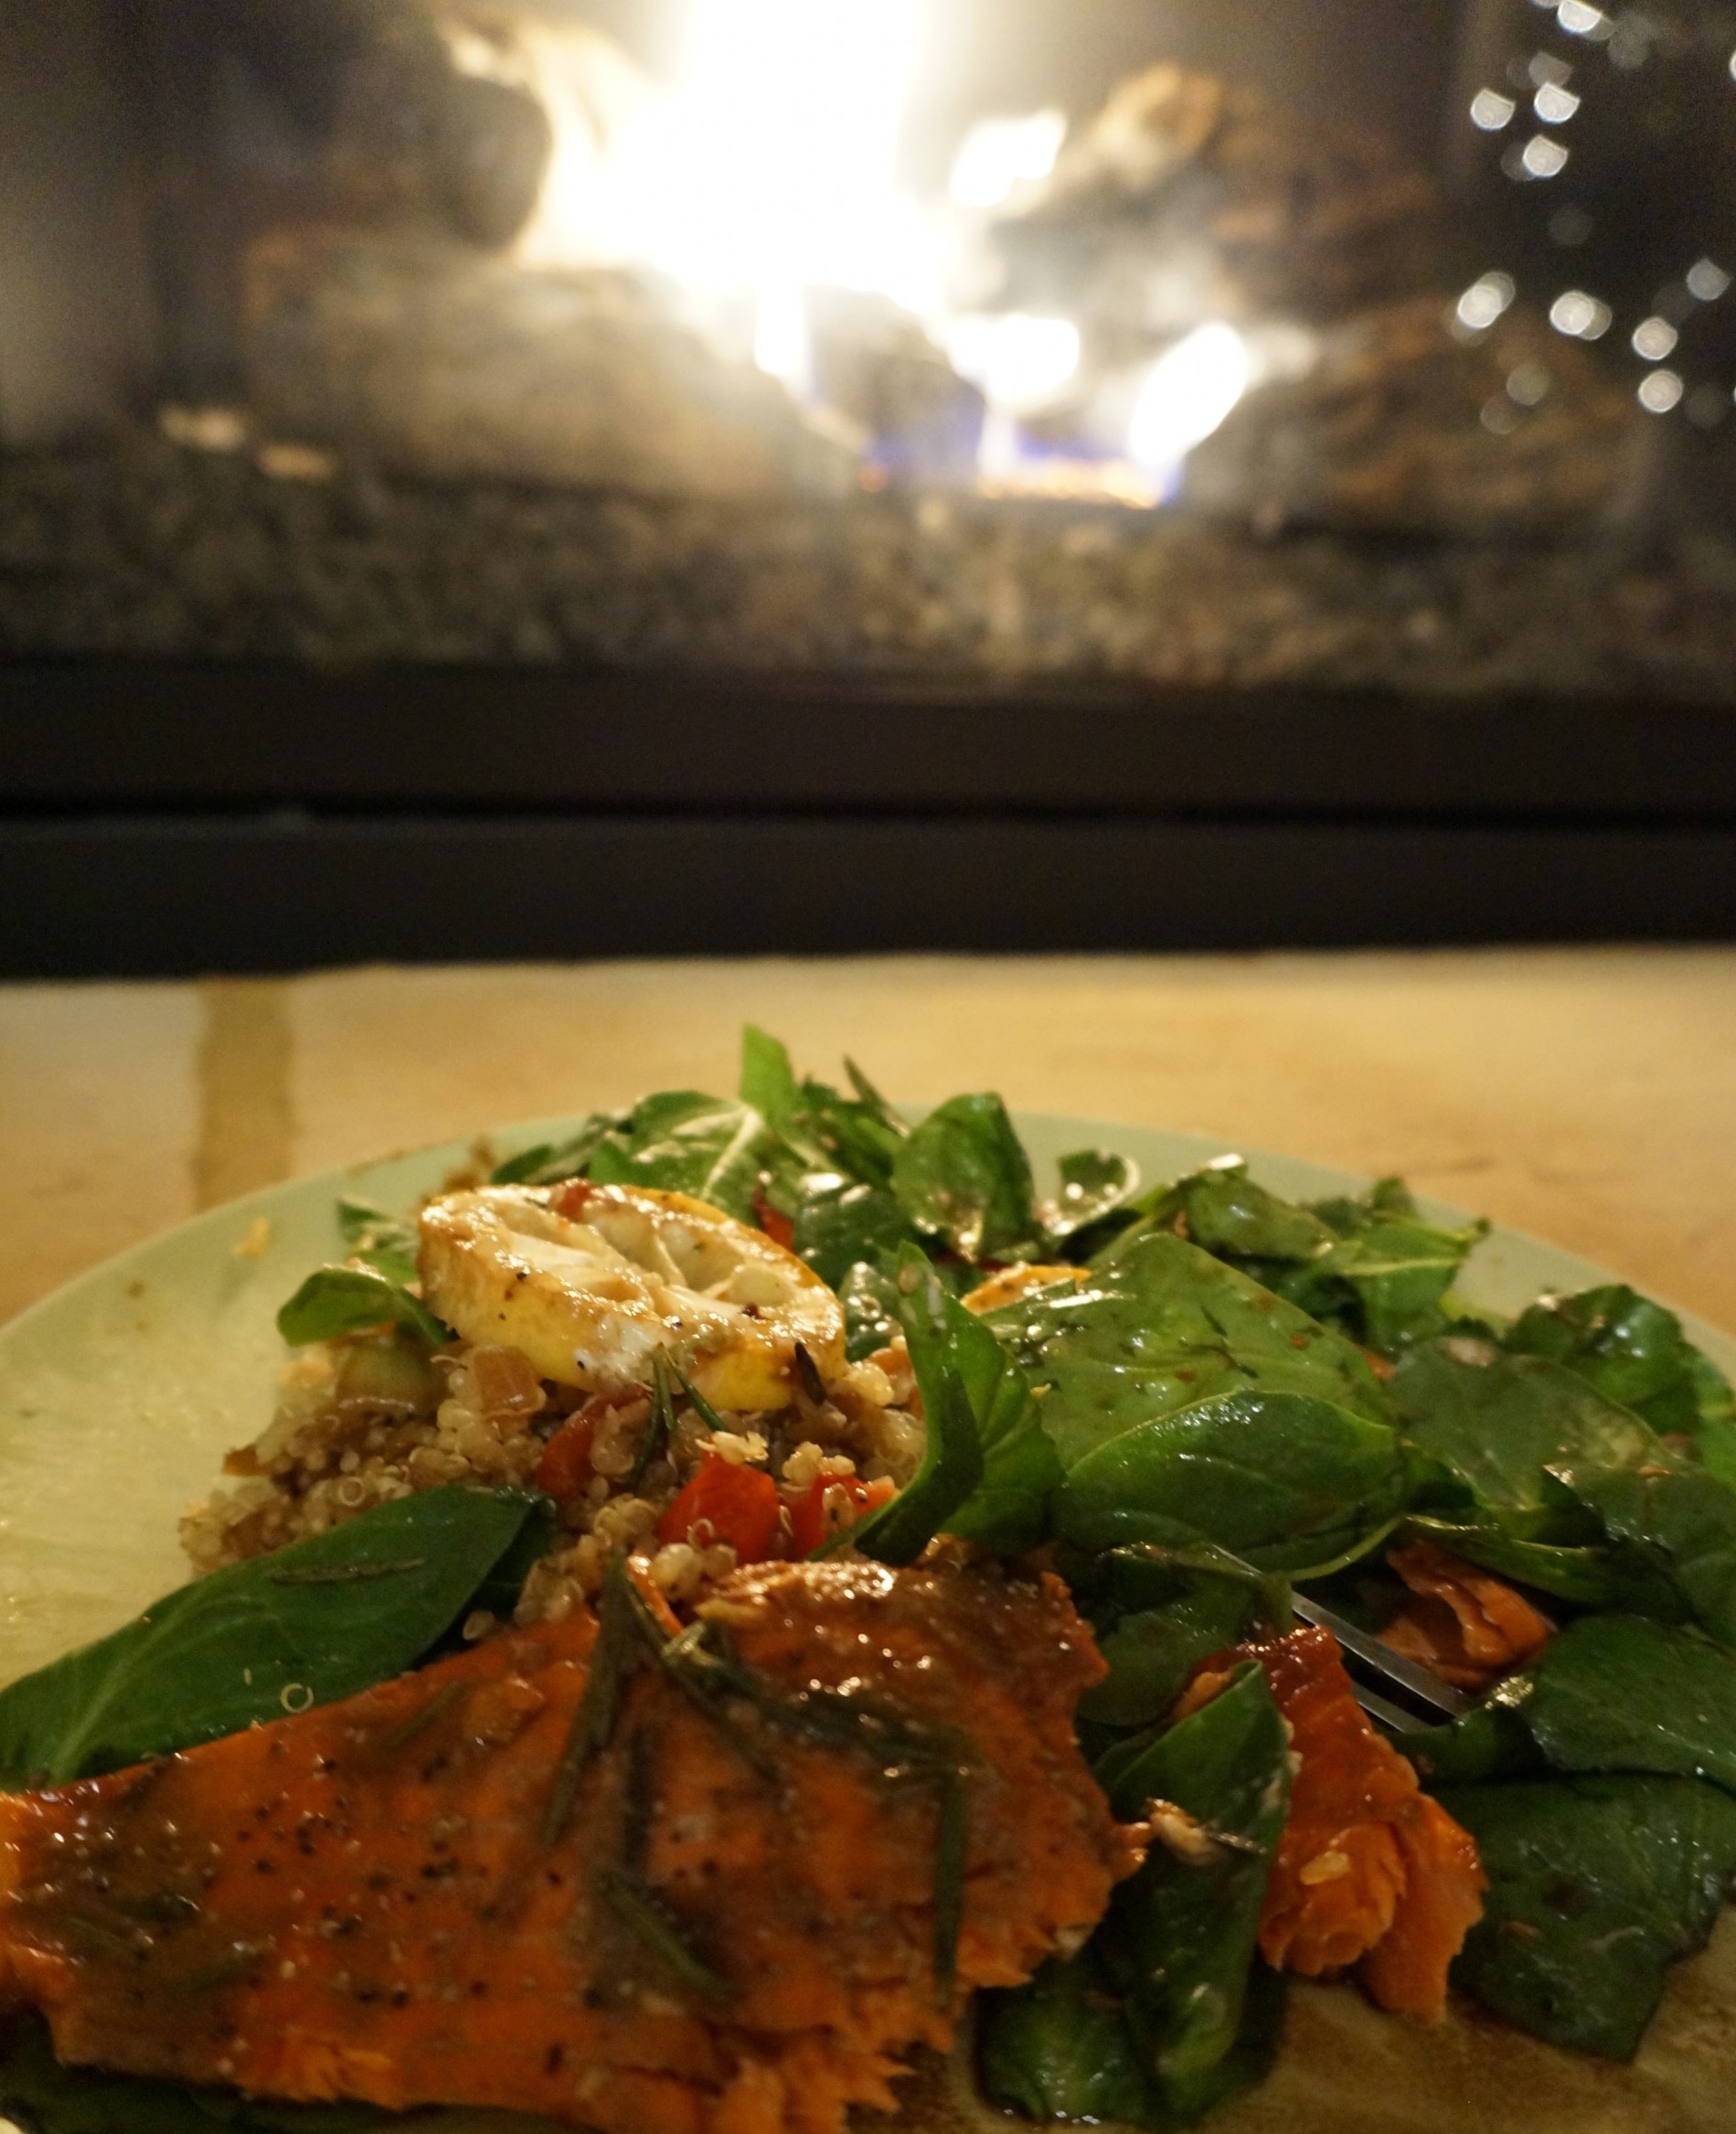
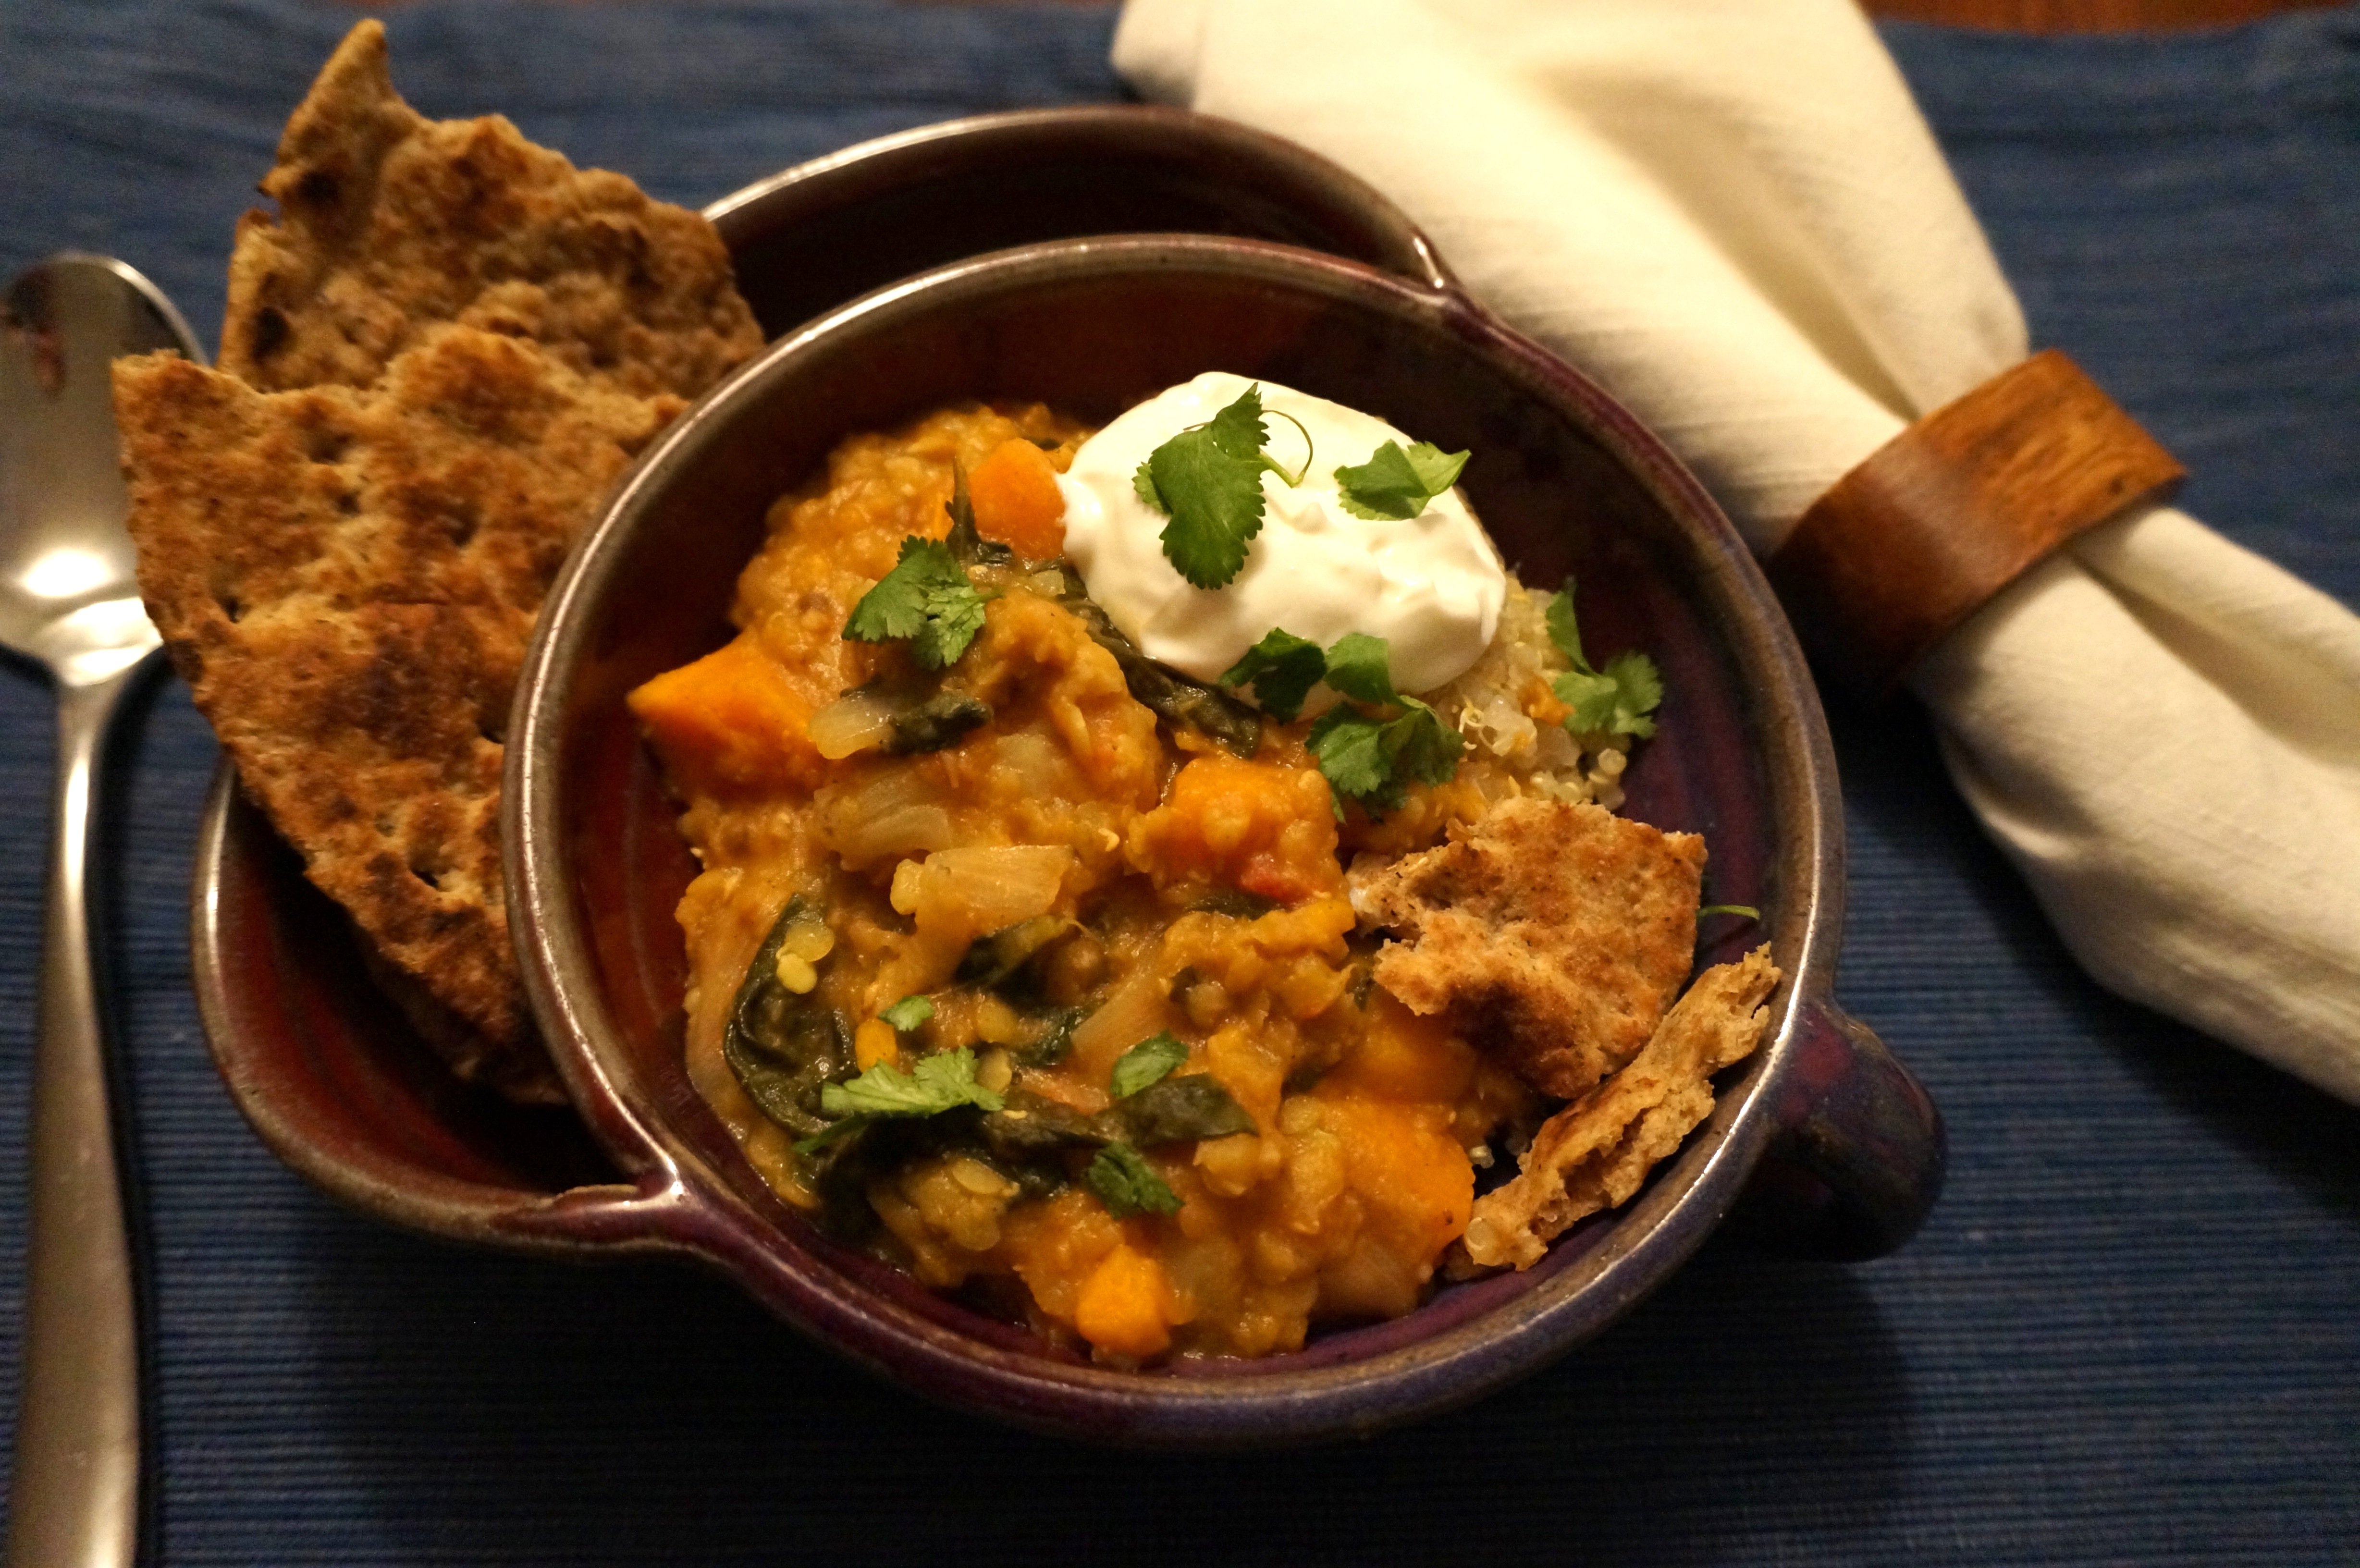
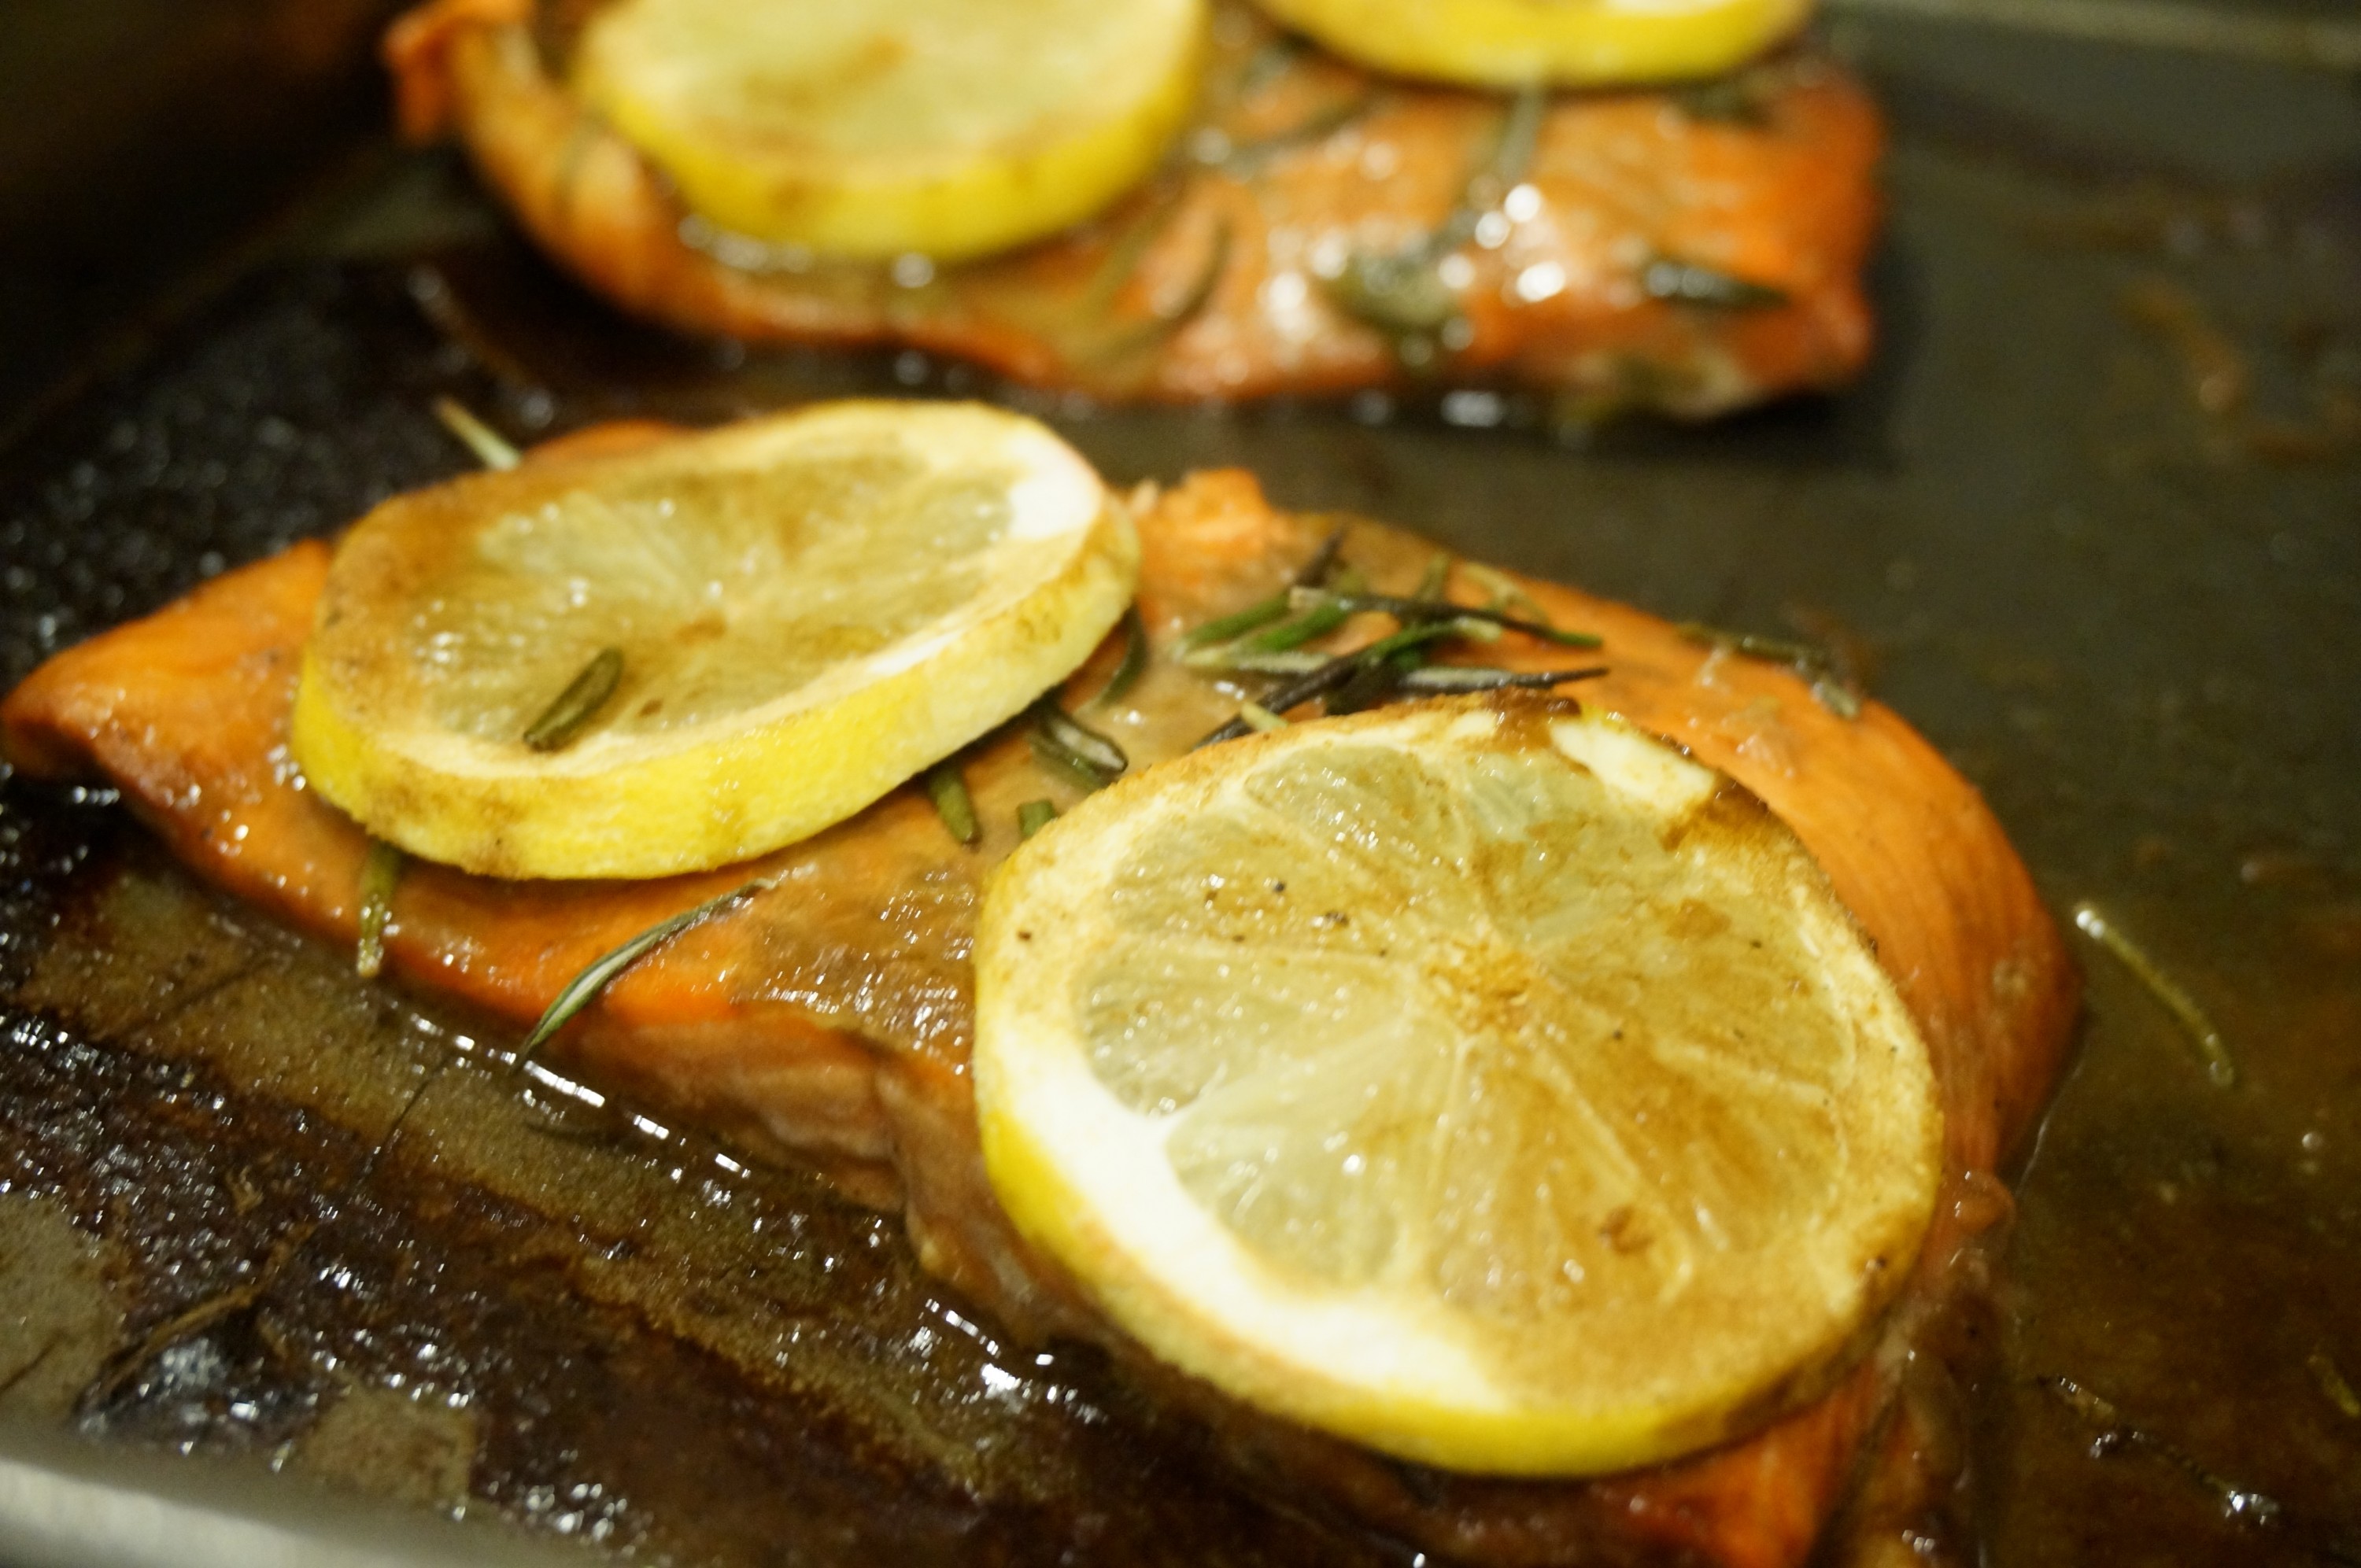
Last night, one of my dear friends from Duke undergrad, Jessie, and I cooked up a delicious salmon dinner together! We decided on a balsamic marinated baked salmon, with hints of lemon and rosemary. Served over rosemary-garlic quinoa with a spinach salad on the side! It was the perfect meal for a busy week of class for both of us (she’s a med student at Duke now!), and it was such a sweet time that we had just chatting in the kitchen (with our aprons on, of course) and sitting on big fluffy pillows by the fire. It was the coziest night I can remember in a while!

The nice thing about this recipe is that it uses frozen salmon fillets that you can just take out of the freezer and thaw when you’re ready. The whole thing comes together in less than a half hour, since the salmon cooks so quickly. Next time, I think I’m going to try to broil it from completely frozen and see if that makes any difference in the texture.

Feel free to play around with the spices- up, down, however you like. You could also completely toss the lemon balsamic idea and come up with your own marinade- I was originally going to do a honey teriyaki glaze (keep an eye out for a recipe coming soon!). As far as this one goes, I think next time I might use a tad less rosemary (I always get a little overzealous when it comes to fresh herbs) and perhaps a little more lemon to balance out the balsamic. Other than that, the marinade was delish! The flavor was just light enough to compliment the salmon, and the garlic and onions in the quinoa added the perfect amount of extra “spice.” And definitely make sure to have the strawberry and goat cheese spinach salad on the side!

Enjoy!

DSC00264

Lemon Balsamic Salmon w/ Rosemary & Garlic Quinoa
Recipe Type: Dinner, Main Dish
Cuisine: Seafood
Author: Claire McCormick of “Claire Tastes”
Prep time:
Cook time:
Total time:
Serves: 2-4
A simple, flavorful recipe for oven-baked salmon using fresh lemon and rosemary! Serve with my rosemary and garlic quinoa and a spinach salad on the side.
Ingredients
  • 2 6 oz. salmon fillets, thawed
  • 1/4 cup balsamic vinegar
  • 1/4 cup extra virgin olive oil
  • 1 tbsp Dijon mustard
  • 1/2 tsp pepper
  • 1/2 tsp salt
  • 1 tsp minced garlic
  • 1 tsp fresh minced rosemary
  • 1/2 tsp lemon zest
  • 1 1/2 tsp fresh lemon juice
  • 4 lemon slices
  • extra rosemary, for garnish
  • 1 cup dry quinoa
  • 2 cups water
  • 1 small onion, diced
  • 1 tbsp fresh rosemary, minced
  • 1 heaping tsp minced garlic
  • 1 tbsp olive oil
Instructions
  1. Preheat oven to 400 degrees.
  2. Prepare a baking sheet by covering with foil and spraying generously with cooking spray or a bit of oil.
  3. In a small bowl or tupperware, combine vinegar, olive oil, Dijon, salt, pepper, garlic, rosemary, lemon zest, and lemon juice. Whisk together until smooth. Reserve about 1/3 of mixture for later (this will be the dressing for the salad!).
  4. Pour the remainder of the marinade into a large ziplock bag. Add the salmon and massage the marinade into both sides of the fish.
  5. Refrigerate for at least 15 minutes.
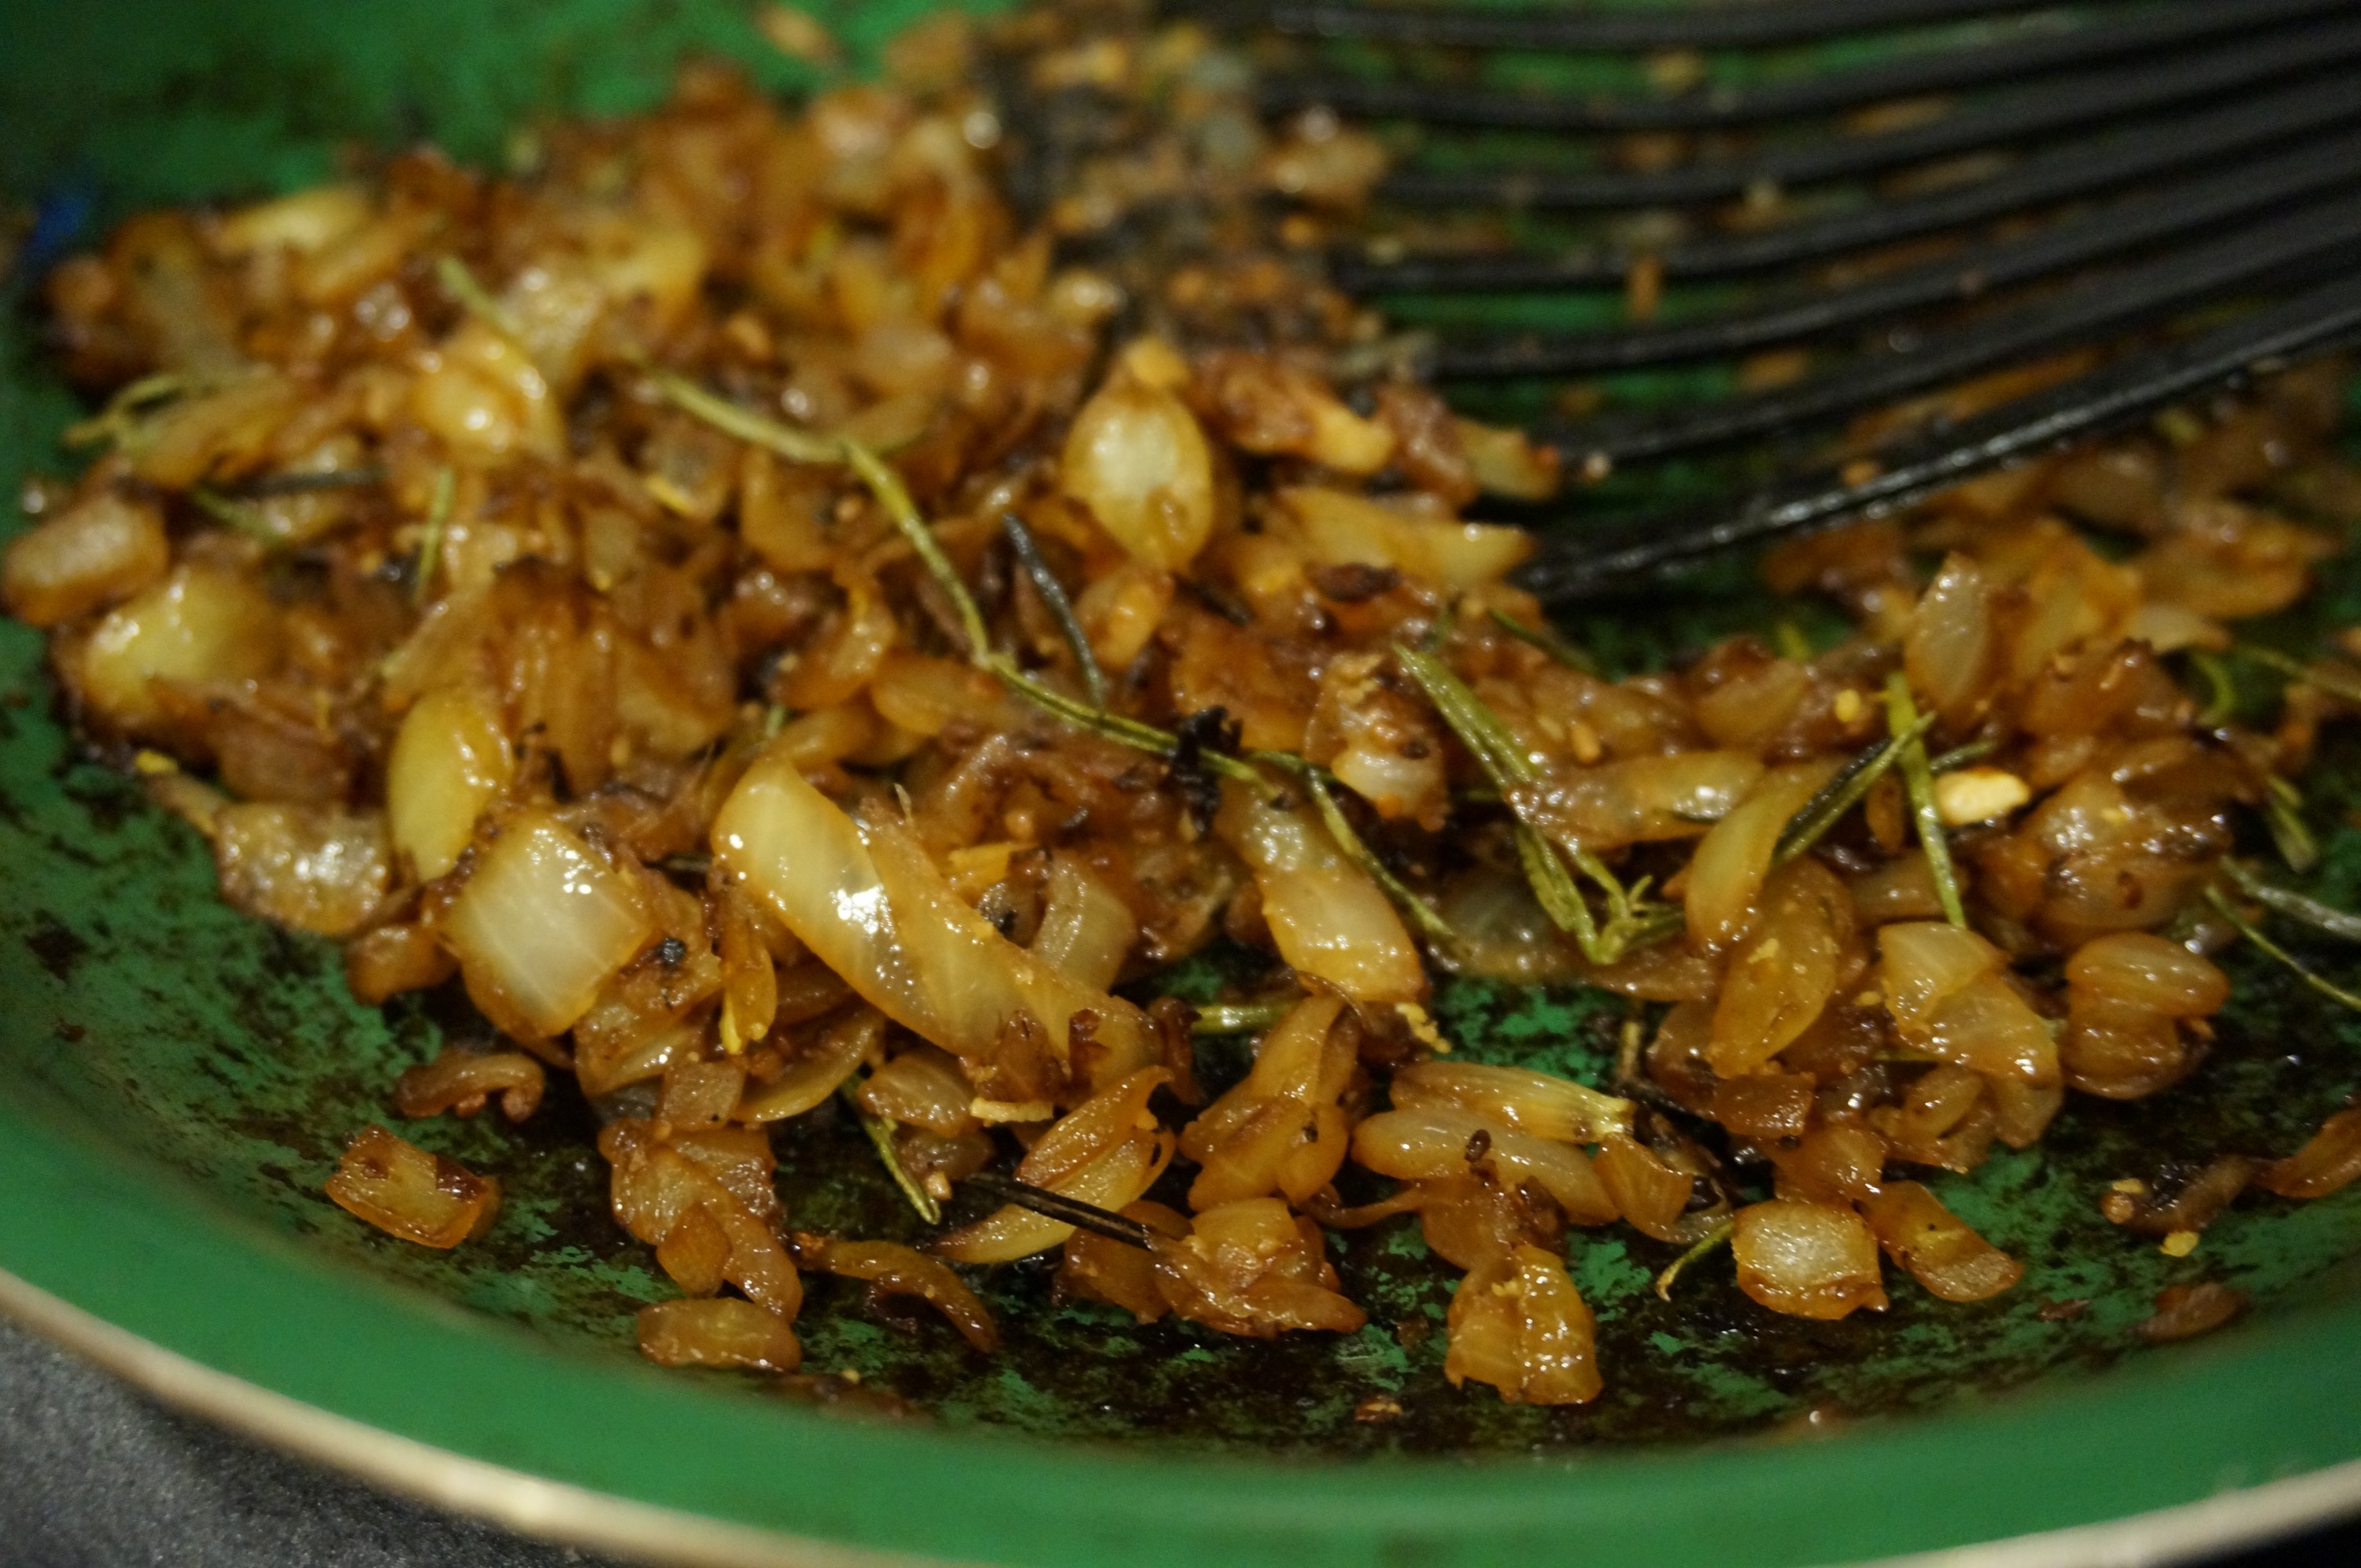
  6. Meanwhile, add olive oil to saute pan and turn heat to medium high. When pan is hot, add diced onion, 1 tbsp minced garlic, and 1 heaping tsp fresh, minced rosemary. Cook 3-5 minutes or until onion is soft. You can also add a bit more lemon zest, and some salt and pepper for extra flavor!
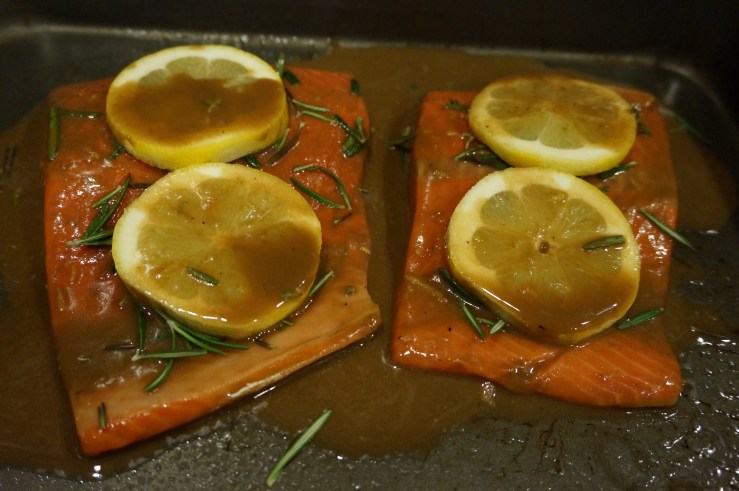
  7. Place salmon on prepared baking sheet and drizzle with a bit of the reserved marinade. Top each fillet with extra rosemary and two lemon slices.
  8. Bake at 400 degrees for 12-15 minutes or until fish flakes easily with a fork.*
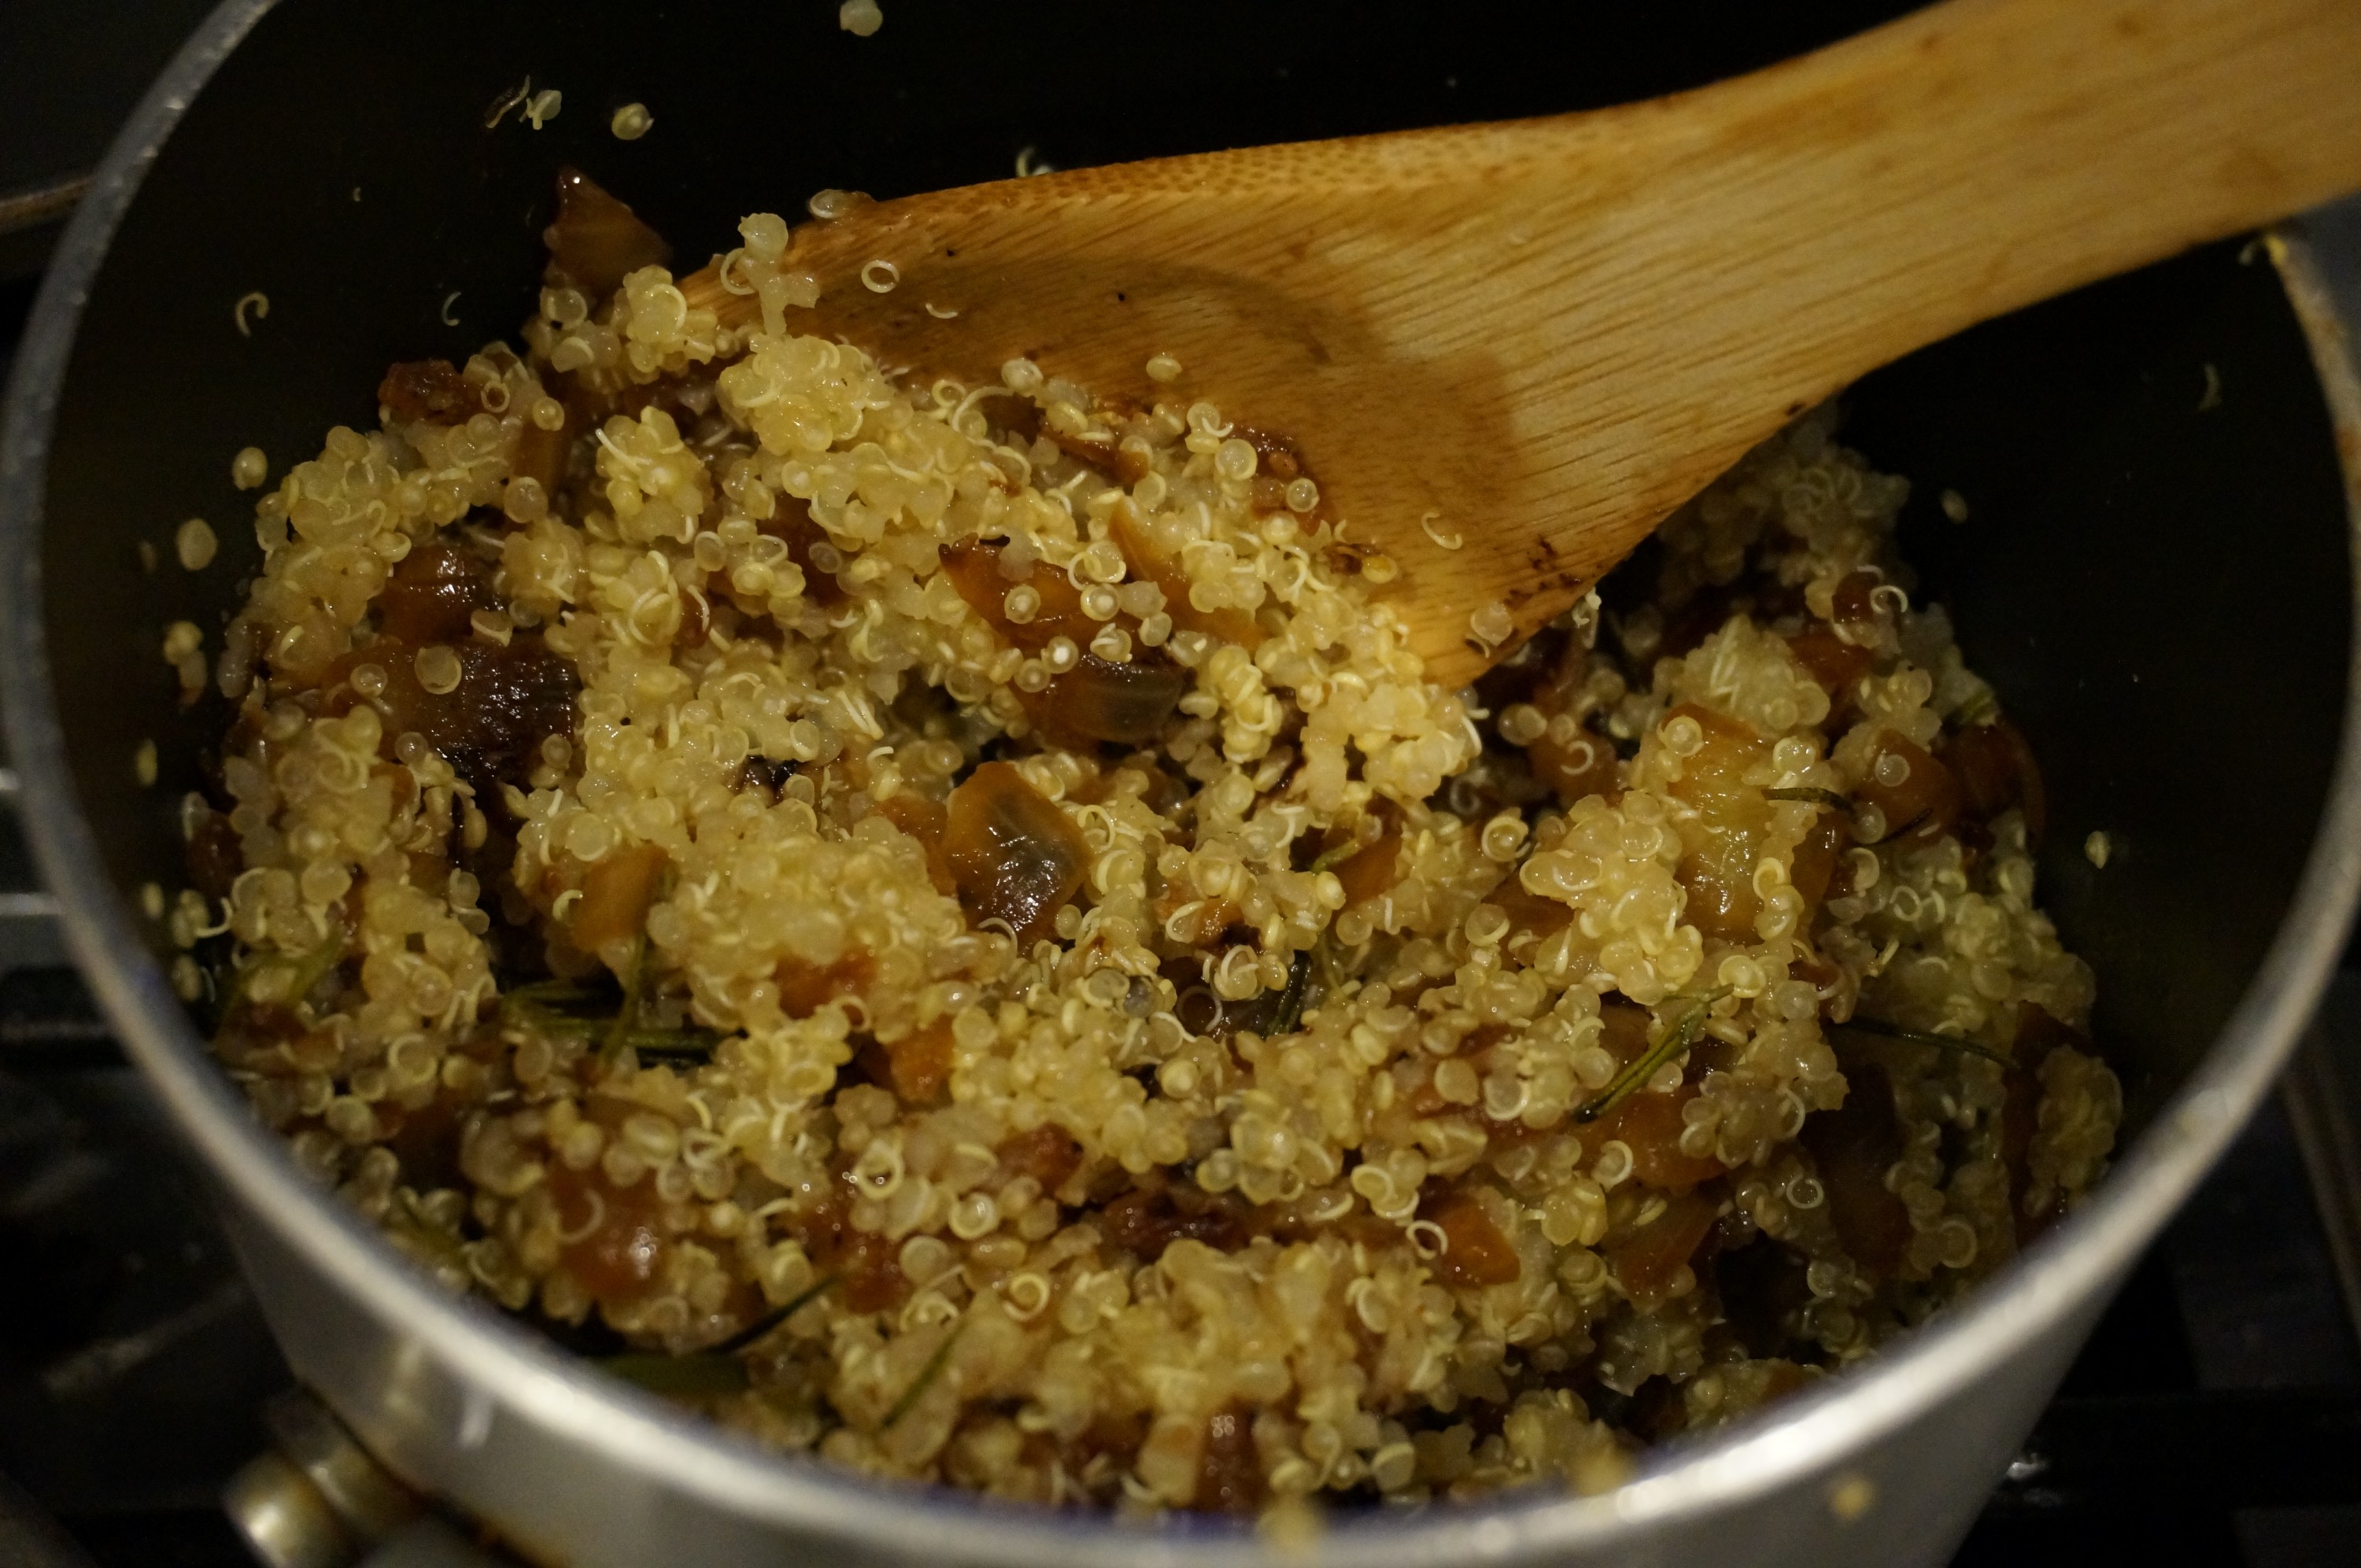
  9. While salmon is baking, cook quinoa according to package directions.
  10. When quinoa is done, stir in the garlic and onion mixture. Turn heat to low to keep warm.
  11. Remove salmon from oven and serve over quinoa.
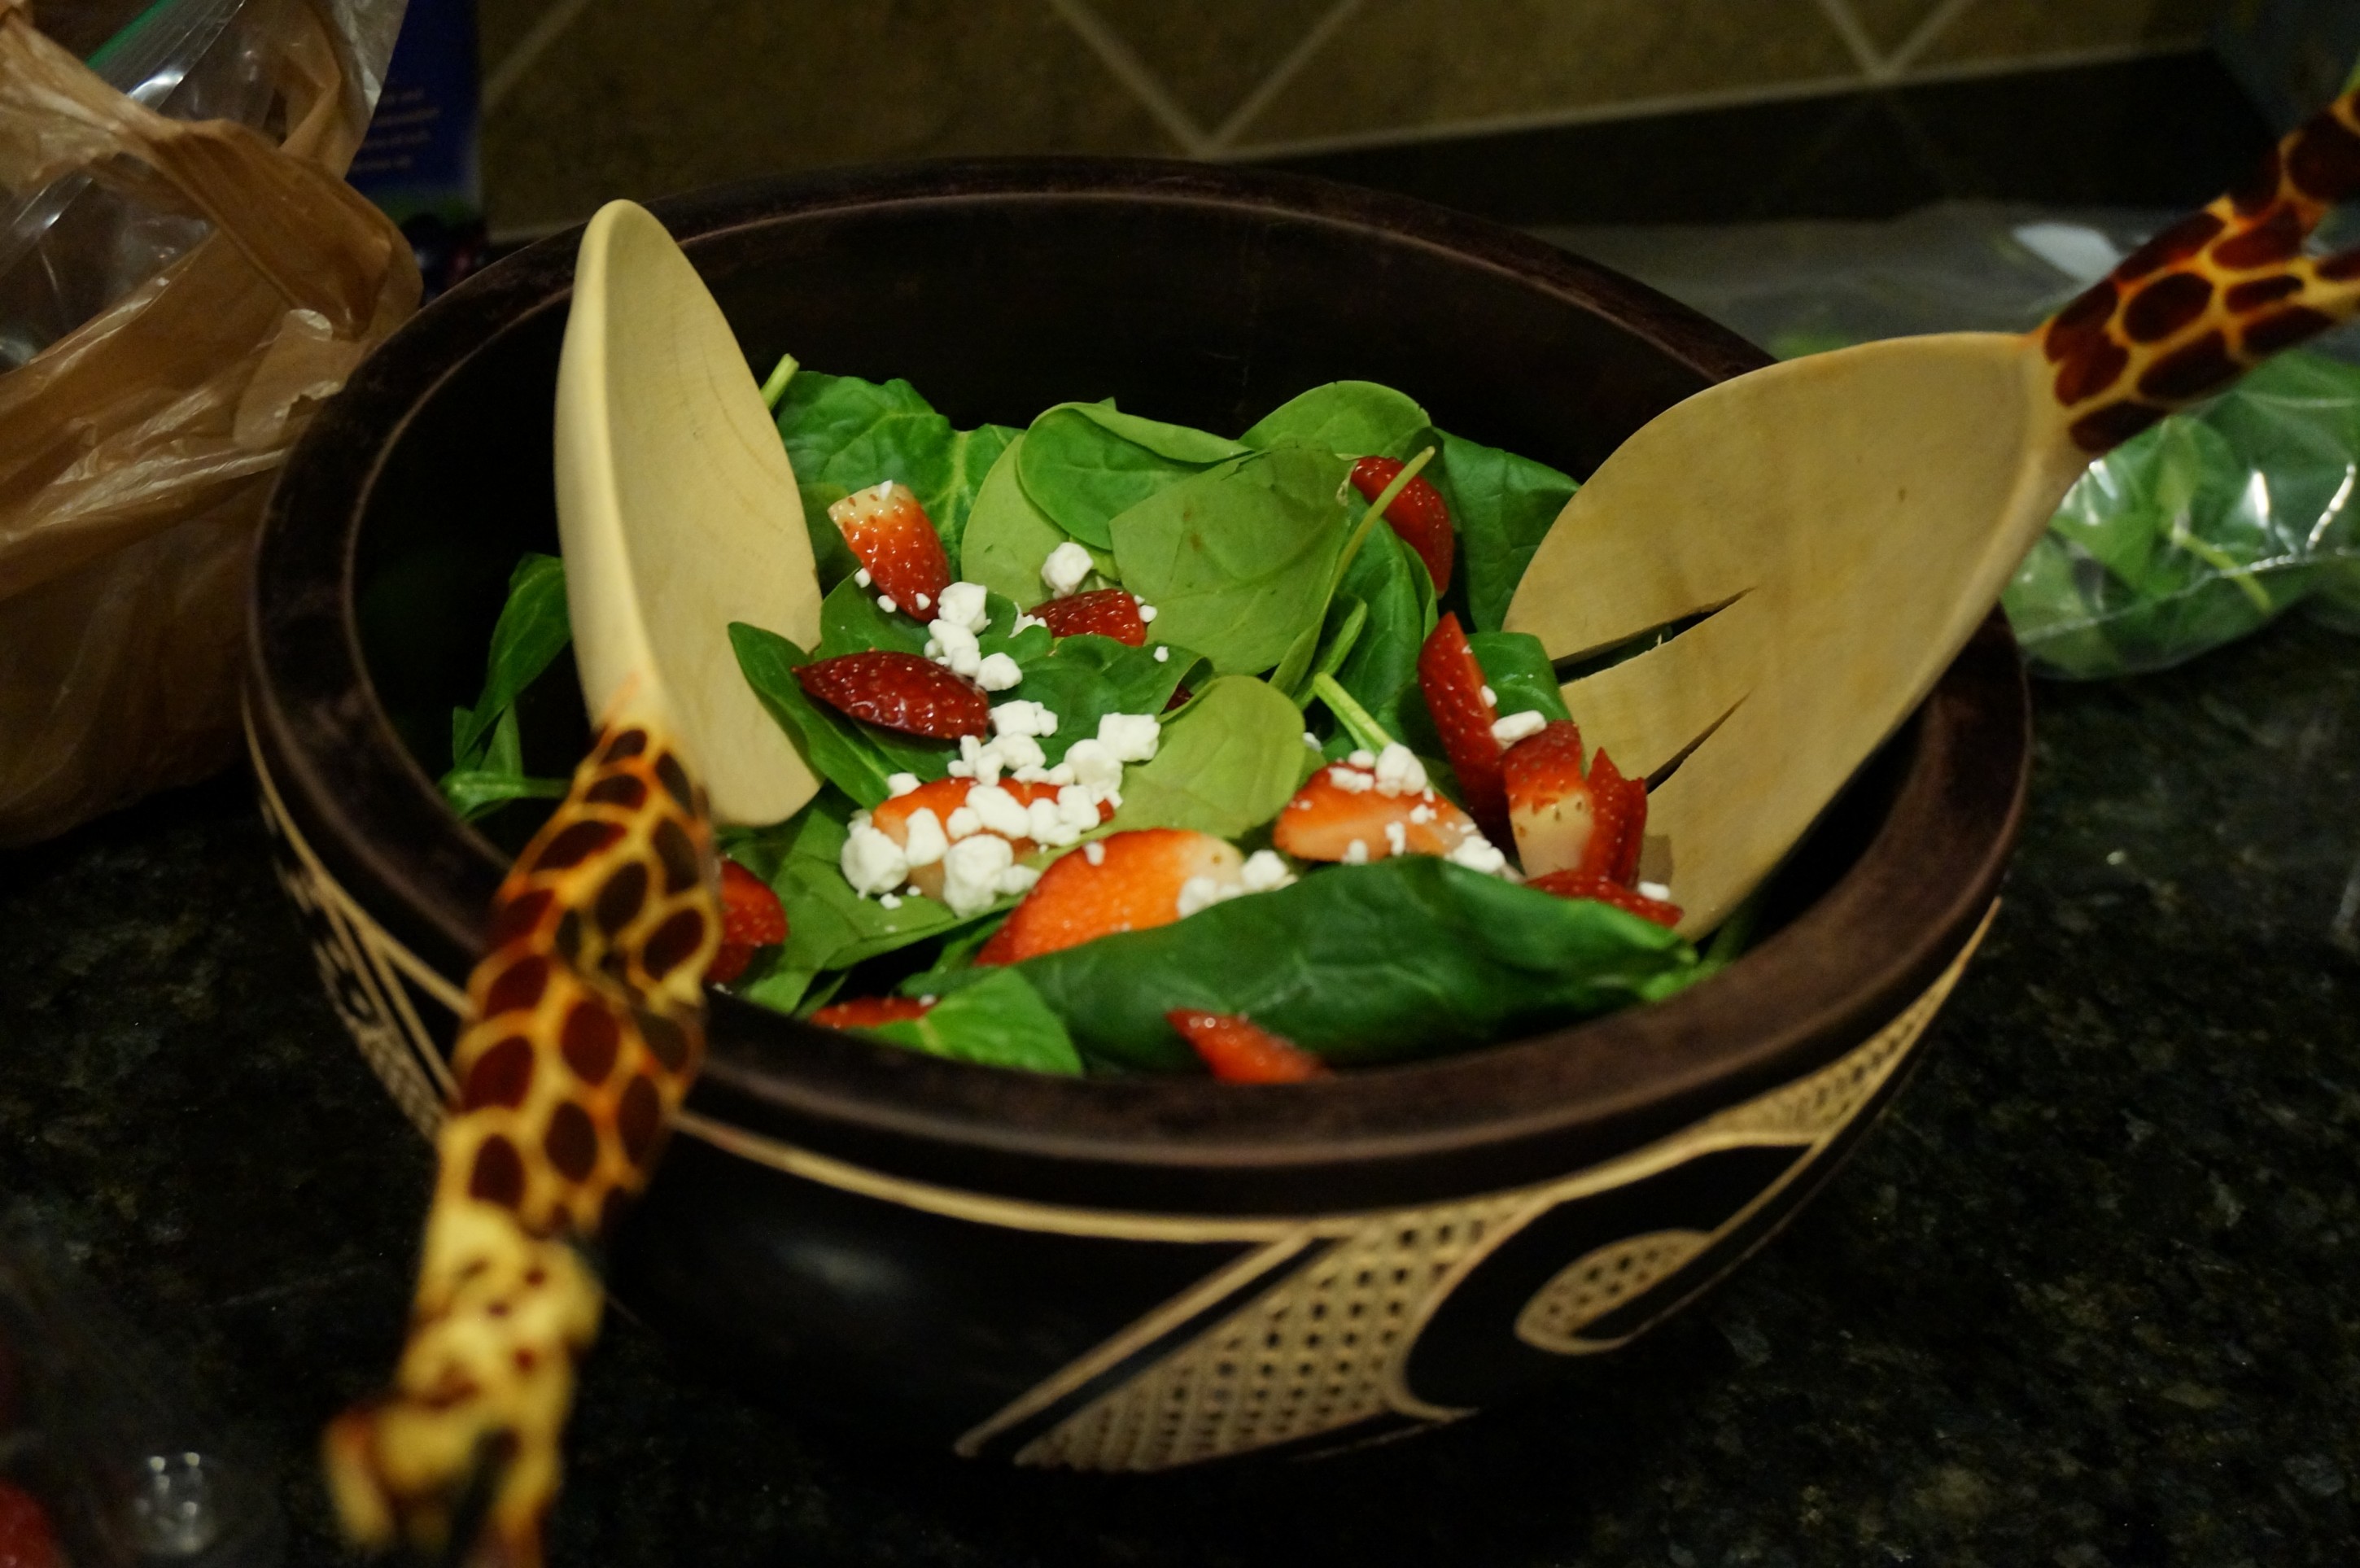
  12. We also served with a spinach salad on the side: simply add spinach to a salad bowl and top with sliced strawberries and crumbled goat cheese! Drizzle with a bit of the reserved marinade for a tasty balsamic dressing.
Notes
*Our salmon wasn’t completely thawed so we baked it for about 15 minutes, then broiled it on high for an additional 3 minutes!

DSC00245

DSC00254

DSC00266

DSC00259

DSC00273

DSC00269

DSC00274

Honey Chipotle-Glazed Chicken Thighs, with Roasted Potatoes & Veggies

Ever since I decided I wanted to cook in a way that minimizes ingredients, cost, and dishes at the same time as maximizing yum-factor and leftover potential, I quickly fell in love with chicken and veggie bakes like this one, which I found originally on one of my favorite blogs, Kath Eats Real Food. The result was a big casserole-type dish with lots of nutrients, flavor, and a huge amount of wiggle-room to experiment with a ton of flavors and combinations! I think the best part is that you can literally use any combo of ingredients you already have in your fridge or pantry- even frozen ingredients work like a charm!

I’ve had a blast trying to come up with the tastiest new creations to experiment with, and my favorite by far has been the Lemon and Dill Chicken and Bean Bake (linked above- you may find that it actually looks quite similar to this recipe!). But since the weather has gotten colder, I decided a smokier flavor might be the best choice for my next chicken bake. I settled on this honey-chipotle-glazed chicken thigh bake, served over a combination of roasted red and sweet potatoes and mixed with kale, tomatoes, mushrooms, broccoli, and cauliflower. As expected, the juices from the chicken thighs drip down and do their magic, cooking the veggies in a flavorful, meaty “sauce” so that you don’t even need to add many spices at all to the veggies in order to get max flavor! The glaze on this chicken also is the perfect stickiness… next time I might even decide to make some slits in the chicken to allow it to seep down into the nooks and crannies and add an extra punch of honey-chipotle BAM to your bake. Yum!

DSC00233

Honey Chipotle-Glazed Chicken Thighs w/ Roasted Potatoes & Veggies
Recipe Type: Chicken Bake, Easy Dinners
Cuisine: Southwestern
Author: Claire McCormick of “Claire Tastes”
Prep time:
Cook time:
Total time:
Serves: 6
Try this simple recipe for baked chicken thighs with a delicious honey-chipotle glaze! Just toss some potatoes and veggies into a casserole dish and layer the glazed chicken on top. You’ll have a tasty, healthy casserole and leftovers for the whole week!
Ingredients
  • 6 boneless, skinless chicken thighs, patted dry
  • 2 1/2 tbsp olive oil
  • 2 tsp minced garlic (about 4 garlic cloves)
  • 1/2 tsp chili powder
  • 1/2 tsp jerk seasoning (if you have it)
  • 2 tbsp honey
  • 3 tsp apple cider vinegar
  • 1/2 tsp garlic powder
  • 1 tsp salt
  • 1 tsp cumin
  • 3/4 tsp cinnamon
  • 5-7 small red potatoes, chopped into ~1″ chunks
  • 2 sweet potatoes, chopped into ~1″ chunks
  • Any veggies you want! (I used, 1 bunch kale, 1 cup broccoli and cauliflower florets about 1/2 cup halved grape tomatoes, and a handful of sliced white mushrooms)
  • Extra garlic powder or onion powder (1 tsp), for dusting veggies
Instructions
  1. Preheat oven to 375 deg.
  2. Spray bottom of a large casserole dish with cooking spray.
  3. In a large bowl, toss all potatoes with olive oil and a little onion or garlic powder. Spread evenly in bottom of casserole dish.
  4. Throw veggies on top of potatoes. Stir gently so that they get coated with a bit of the oil (I sprayed them with a bit more cooking spray, too).
  5. In a small bowl, whisk together olive oil, garlic, chili powder, jerk seasoning, honey, vinegar, garlic powder, salt, cumin, and cinnamon (Yes, I know that’s a lot of spices!) until you get a pretty thick paste!
  6. Layer chicken thighs on top of potatoes and veggies. Drizzle with a little extra olive oil and rub each one with some of the glaze. Make sure to evenly divide the garlic, as it has a tendency to clump together! (Let’s share the garlic breath love, people!)
  7. Cover lightly with foil. Bake, covered, at 375 deg for 30 minutes. Remove foil and bake uncovered for 10-20 minutes longer, until chicken is no longer pink in center and potatoes are fork-tender.
  8. Allow to cool for a least 5 minutes before serving!
Notes
You could also use chicken breasts in this recipe, but I have to say, even as a white meat lover, the juiciness of the dark meat of these chicken thighs is definitely worth the extra few calories. Plus, it’s cheaper!

DSC00214

Layer potatoes and veggies in casserole dish, sprinkling with a touch of garlic powder or onion powder. Don’t you love all the colors? Sometimes I feel like the most intuitive way to cook nutritiously is by color!

DSC00221

Layer chicken thighs on top of veggies, drizzle with a bit of oil, and rub down with about a tablespoon or so of the sticky glaze you created. Bake at 375, uncovered for 30 minutes, and uncovered for 10-20 minutes until done.

DSC00233

Ta-da!

Sweet Potato Masoor Dahl

DSC00197

For some reason I have been craving Indian food all week. Maybe I’ve just been needing a change in flavor, with the holidays just behind us and too much chocolate and peppermint flavored yummies in my tummy. Or maybe I just like Indian a lot. After all, I’m a sucker for spices. And with this cold, blustery January day, I felt like it was high time for a solid crock pot recipe to warm up my bones. Okay okay, I know I’m not fitting into that “1 in 3 Americans affected by the Nor’ Easter Hercules” as many of my friends and family in CT (I actually almost convinced my mom earlier that I’d been wearing shorts and flip flops all day here), but hey! We get chilly days in Durham, too. And I’m a Southern girl now, which means my blood is not accustomed to anything lower than 40 degrees.

Moreover, as I see post after post on the Internet about New Year’s resolutions including eating healthier, exercising more, and striving to lose weight, I figured a heart-healthy and vegetarian dish that doesn’t skimp on heartiness or flavor would be welcome to many of my readers! [**Spoiler alert** If you don’t like curry or lentils, sorry, you’re out of luck for this one. Go visit my Pesto Chicken Monte Cristos post and be quiet.] Packed with vitamins and nutrients, this recipe is a complete protein when served over a grain such as brown rice or quinoa. Whether you’re looking to cut down on calories without sacrificing flavor, or you just want a healthy meal that’ll stick with you, this sweet potato dahl is the perfect choice. I can’t wait to share it with you!

I used masoor dahl here, which basically means red lentils. You can also use green/black lentils or even split peas, but I hear they take longer to cook. I prefer red lentils for that classic yellow hue that I always associate with Indian stews.

What I love about this recipe is that you can really add any veggies you want, as long as you chop them up thinly enough! (I might stay away from asparagus or sprouts, but that’s just me.) I used diced tomatoes (canned, of course- this recipe is for lazy people!), sweet potatoes (because as we all know, they are my weakness), yellow onions, cauliflower (frozen!), carrots, and baby spinach. Kale would also be amazing (they were out at the store, otherwise I probably would’ve used it for a bit more texture and chewiness).

Sweet Potato Masoor Dahl
Recipe Type: Slow Cooker, Easy Dinners
Cuisine: Indian
Author: Claire McCormick of “Claire Tastes”
Prep time:
Cook time:
Total time:
Serves: 8-10
The easiest red lentil dahl you will ever make! Throw all the veggies, lentils, and spices in the crock pot and set to high for 4 hours. Add cilantro and lemon juice just before serving. Ladle over quinoa with a dollop of plain yogurt on top.
Ingredients
  • 2 cups masoor dahl (red lentils), rinsed
  • 4 cups chicken stock (or vegetable stock to keep it vegan!)
  • 10 oz fresh baby spinach (kale would work great too!)
  • 2 medium sized sweet potatoes, chopped into small chunks
  • 4 whole carrots, chopped
  • 1 medium onion, chopped
  • 1 1/2 cups frozen cauliflower
  • 1 14 oz can low-sodium diced tomatoes
  • 1 tbsp minced garlic
  • 1 tbsp ground ginger
  • 1 tbsp curry powder
  • 1 1/2 tsp ground mustard seed
  • 1 tsp ground coriander seed
  • 1 tsp whole coriander seed (optional)
  • 1 tsp ground cumin
  • 1/4 tsp cayenne pepper
  • 1/2 tsp garlic powder
  • 1/8 tsp red pepper flakes
  • 2 tsp sugar
  • 1 1/2 tsp kosher salt
  • 4 tbsp lemon juice
  • handful of chopped cilantro, to taste (plus more for garnish)
  • plain Greek yogurt, for serving
  • 2 cups cooked quinoa or brown rice, for serving
  • multigrain flatbreads, for serving
Instructions
  1. Prepare veggies by chopping sweet potato, onion, and carrot.
  2. Add to crock pot.
  3. Add lentils, stock, and all spices.
  4. Set slow cooker to high for 3-4 hours, or low for 6-7 hours. You’ll know when the dahl is done when the lentils have broken down and gotten all mushy! (sounds gross but you know… I like that sort of thing :P)
  5. Just before serving, add spinach, cilantro, and lemon juice. Set slow cooker to warm.
  6. Warm flatbread in oven for a few minutes (for example, while you simmer the quinoa) or in microwave oven.
  7. Serve over rice or quinoa, with a dollop of plain yogurt and additional cilantro on top! Also great with flatbread for dipping, especially if you have a husband who’s a sucker for bread.
Serving size: 1 1/2 cups dahl and 1/2 cup cooked quinoa Calories: 130 Fat: 1 g Saturated fat: 0 g Carbohydrates: 22 g Fiber: 6 g Protein: 9 g

DSC00162

Gather all your ingredients- veggies, spices, and lentils. This is probably the hardest step of the entire recipe. You think I’m joking. Just wait.

DSC00167

Chop away at those veggies! (Ok, maybe THIS is the hardest part). Mmmm… sweet potatoes.

DSC00169

No lack of spices in this recipe. Gotta love Indian food for that. 🙂 I don’t know why I put them all in a bowl first. Probably because they look prettier that way.

DSC00170

Toss it all into the slow cooker and set to high for 3-4 hours, or low for 6-7.

DSC00172

What it’ll look like when it’s almost done!

DSC00182

Add your spinach, cilantro, and lemon juice…

DSC00193

Ready to serve!

DSC00197

DSC00199

Ladled over quinoa, and topped with a dollop of plain greek yogurt, more cilantro, and multigrain flatbread. Sweet Potato Masoor Dahl FTW!

Smoked Turkey Guacamole Rollup

With lots of leftovers in the house from Taco Night, I decided that today for lunch I’d mix it up a bit and revisit my wrap days. I used to be a die-hard wrapper (pun intended) and had one almost every day! But then I got out of the habit, and haven’t really done a lot with them in the past few months.

But making this rollup today may have converted me back. Using a regular whole wheat tortilla, I slathered some leftover guac, baby spinach, a few slices of smoked turkey, leftover Black Bean and Corn Salsa, sliced tomato, a few drops of lime juice, and a sprinkling of shredded cheese.

DSC00175

I wrapped it all up in some tin foil and stuck it in the oven for 10 min at 350 deg. Then, to get that crispy outer shell, I unwrapped it and broiled it for about 2 minutes.

DSC00176

The result was exactly what I’d hoped for. Crispy on the outside, warm and gooey on the inside, with that delicious hint of lime and a bit of smokiness from the turkey and guac. Served over more spinach with some carrots, grapes, and a dollop of salsa on the side. The perfect lunch!

DSC00179

DSC00180

What did you have for lunch today?

No-Fuss Crock Pot Chicken Tacos

Happy, happy New Year! I hope you all had a fantastic holiday and a blessed time with your family and friends. I know I did! Ben and I spent a week in CT visiting my family, followed by a few days back here in Durham with his family visiting from Pittsburgh. What a blessing to be able to see both sides! It was the best of both worlds. 🙂

I have been having a blast learning more about my new camera, which Ben got me for Christmas after insisting that it was “much” too expensive. *Ahem.* Yeah right. He spoils me! It’s been so much fun playing with it, though. I got lots of shots of my parents’ new puppy, as well as many a round of Dutch Blitz by the fire. Best of all, I swear it makes my food look wayyy better than my old pics taken with my iPhone. I can’t wait to share some brand new recipes with you, just in time for 2014!

While Ben’s family was here, I tried out a new recipe for crock pot chicken tacos. It seemed like a good choice, since tacos are the kind of thing that everyone can create the way they like. There’s also something cozy about sitting around the table and constantly passing each other the topping ingredients (or at least it helps everyone work on their “please” and “thank-you”s). This was honestly one of the easiest recipes I have ever made (do I say that too much? :P), and they kept raving about it, so either they are just being extremely polite, or it really is a keeper. I like to think the latter?

Anyway, this recipe was adapted from Iowa Girl Eats, one of the regular bloggers I follow. It literally has three ingredients (a few more if you make your own seasoning) that you probably already have in your pantry! Chicken, salsa, and taco seasoning. That’s IT! Shredding the chicken and returning it to the saucy goodness of the crock pot before serving allows it to soak up all the salsa and stay nice and juicy. Because we all know there is nothing worse than dry taco meat.

I also served these with my tried-and-true Black Bean and Corn Salsa, a recipe which everyone always seems to like, and with awesome leftover potential!

DSC00144

No-Fuss Crock Pot Chicken Tacos
Recipe Type: Easy Dinners, Slow-Cooker
Cuisine: Mexican
Author: Claire McCormick of “Claire Tastes”
Prep time:
Cook time:
Total time:
Serves: 8-10
This recipe literally uses 3 ingredients! Just throw them all into the crock pot and set to low heat for 6 hours or until chicken is done, shred, and serve! So easy and soooooo good!
Ingredients
  • 6 chicken medium breasts, sliced in half
  • 1 packet low-sodium taco seasoning*
  • 24 oz. jar of mild chunky salsa
  • 10 flour tortillas
  • Toppings: shredded cheese, rice, guacamole, avocado slices, lettuce, green onions, sour cream or (plain greek yogurt), diced tomatoes, cilantro, beans, corn, extra salsa, tortilla chips… the list goes on and on! (seriously though, what DOESN’T go on tacos?)
Instructions
  1. Lightly spray bottom of crock pot with cooking spray.
  2. Carefully place halved chicken breasts in a single layer across bottom of the crock pot (if your pot is too small for a single layer like mine is, you can do two layers instead- just make sure to only use 1/2 of the taco seasoning and salsa for each layer!).
  3. Top with taco seasoning.
  4. Top with jar of salsa (yes, the WHOLE jar! trust me, it works.)
  5. Carefully lift up the chicken with a fork to allow the salsa to spread underneath a bit.
  6. Set crock pot to low heat for 4-6 hours or high for 2 hours, or until chicken is cooked through. Chicken should fall apart when you pierce it with a fork!
  7. Siesta time! After all, it IS New Year’s Day! You deserve it.
  8. When chicken is cooked through, remove from crock pot with a slotted spoon and transfer to a medium mixing bowl.
  9. Using two forks, shred chicken and return to crock pot.
  10. Mix chicken in so that it gets evenly combined with those yummy salsa juices!
  11. Set crock pot to warm until ready to serve.
  12. Meanwhile, cook rice and prepare toppings.
  13. When ready to eat, nuke tortillas for 30 sec to 1 min or until heated through. Cover with foil to keep warm.
  14. Top your tortillas with chicken and your favorite toppings (I reliably fill mine and cut ’em up, adding more lettuce, to make a big taco salad!)
  15. Serve with my “Black Bean and Corn Salsa” (https://clairetastes.com/black-bean-and-corn-salsa/)
Serving size: 1/10 recipe (w/ sour cream, cheddar cheese, tomato, and lettuce as toppings) Calories: 377 cal Fat: 12 g Carbohydrates: 33 g Fiber: 3 g Protein: 33 g
Notes
*Instead of using store-bought taco seasoning, you can easily make your own by combining 1/2 tsp garlic powder, 1 1/2 tsp cumin, 1/4 tsp onion powder, 1 1/2 tsp chili powder, 1/2 tsp paprika, 1/2 tsp each salt and pepper, and a pinch of red pepper flakes.

Oh… and I couldn’t help but to post this picture of my new chef’s jacket, given to me by Ben’s grandmother for Christmas. Don’t I look official now? Whew- Claire Tastes is in for some major improvements in 2014! I can’t wait!

DSC00124


Cheesy Chicken and Broccoli “Stroganoff”

photo-3-46photo-1-64


Cheesy Chicken and Broccoli “Stroganoff”
Recipe Type: Casserole, Comfort Food
Cuisine: Easy, American
Author: Claire McCormick of “Claire Tastes”
Prep time:
Cook time:
Total time:
Serves: 8
“Comfort food” to the extreme! Get out your slow cooker and let ‘er simmer away all day! Feeds a crowd, and is sure to please even the pickiest of eaters.
Ingredients
  • 2 lbs chicken breasts
  • 1/2 cup lite balsamic vinaigrette
  • 1 tsp garlic powder
  • 1 tsp minced garlic
  • 1 onion, minced
  • 10 white mushrooms, sliced thinly
  • 1 lb (16 oz) broad egg-noodles
  • 1 16 oz package frozen broccoli florets
  • 1 8 oz. package cream cheese (I used 1/3 less fat Neufchatel cheese)
  • 2 cans low-fat cream of mushroom soup (condensed)
  • 3 tsp dijon mustard
  • 1/2 cup shredded cheese (optional- I used a Mexican blend that I had already)
  • salt and pepper to taste
Instructions
  1. Place chicken breasts, vinaigrette, and garlic powder in a freezer bag. Shake to combine and make sure the chicken breasts get evenly coated. Refrigerate at least 1 hour, turning over bag midway.
  2. Spray the bottom of a slow-cooker with cooking spray. Add onions, chicken, and mushrooms and cook on low for 4 hours, or until chicken is fully cooked.
  3. While still in the slow cooker, shred the chicken with two forks. It should pull apart easily!
  4. In a large saucepan, cook egg noodles to al dente, according to package instructions. Drain and add to slow cooker.
  5. In the same saucepan over medium heat, combine Neufchatel cheese, condensed soup, dijon mustard, and frozen broccoli. Mix until smooth and broccoli is completely covered. Add salt and pepper to taste.
  6. Add broccoli and sauce to slow cooker and stir to combine.
  7. Preheat oven to 350 deg. Spray a 9×13″ casserole dish with cooking spray. Spread casserole evenly in dish and sprinkle with shredded cheese (optional).
  8. Cook for 25 minutes or until cheese is bubbly and egg noodles are just beginning to brown.
  9. Cool for 5-10 minutes before serving.
  10. Serve with a side salad and fresh grapefruit wedges.