Smoked Turkey Guacamole Rollup

With lots of leftovers in the house from Taco Night, I decided that today for lunch I’d mix it up a bit and revisit my wrap days. I used to be a die-hard wrapper (pun intended) and had one almost every day! But then I got out of the habit, and haven’t really done a lot with them in the past few months.

But making this rollup today may have converted me back. Using a regular whole wheat tortilla, I slathered some leftover guac, baby spinach, a few slices of smoked turkey, leftover Black Bean and Corn Salsa, sliced tomato, a few drops of lime juice, and a sprinkling of shredded cheese.

DSC00175

I wrapped it all up in some tin foil and stuck it in the oven for 10 min at 350 deg. Then, to get that crispy outer shell, I unwrapped it and broiled it for about 2 minutes.

DSC00176

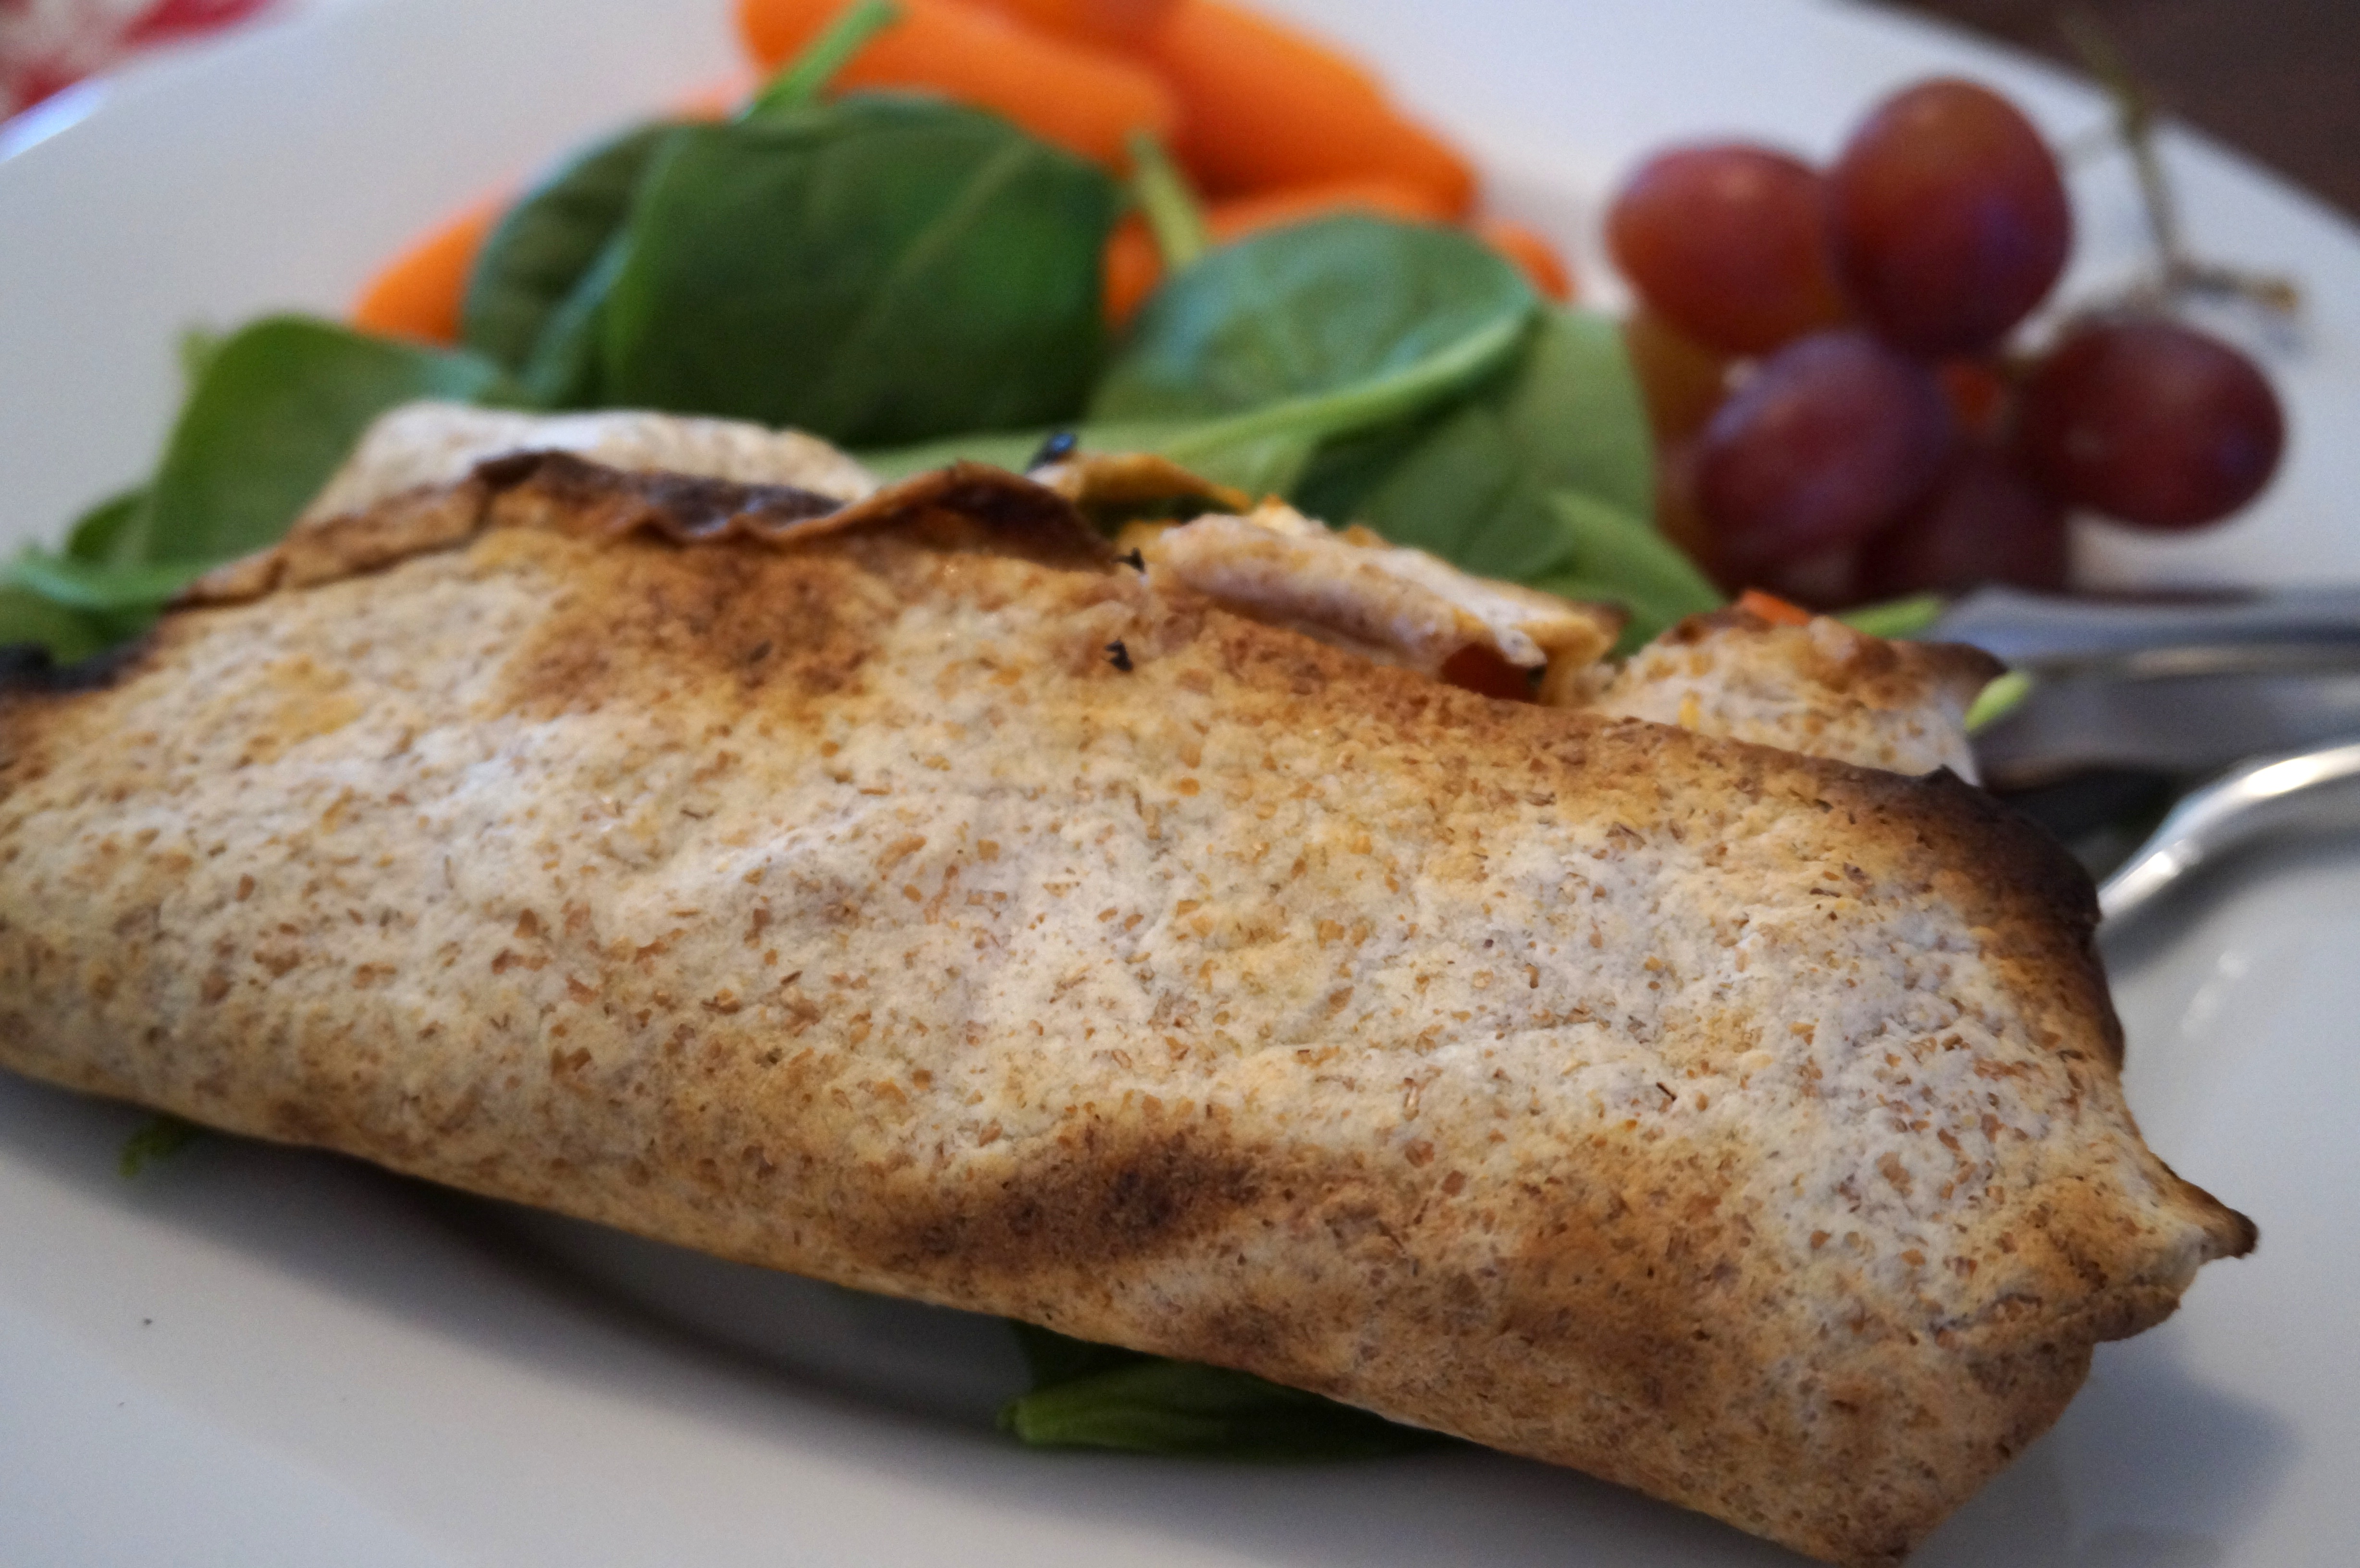
The result was exactly what I’d hoped for. Crispy on the outside, warm and gooey on the inside, with that delicious hint of lime and a bit of smokiness from the turkey and guac. Served over more spinach with some carrots, grapes, and a dollop of salsa on the side. The perfect lunch!

DSC00179

DSC00180

What did you have for lunch today?

Lately: Leftovers!

Leftovers, leftovers, leftovers! You’d think that I’d be cooking up new recipes while I’m on break from school, but we’ve had so much food in the house, I can’t bring myself to make anything new until some of what’s already in the fridge gets eaten! I’ve tried to mix it up a bit by using the same ingredients in different ways, so that Ben and I don’t get sick of having the same thing over and over. Here’s what I’ve been eating lately:

Veggie Lo Mein Salad, w/ Steamed Veggies and Sesame Seeds- from leftover New Year’s Eve Chinese take-out!

Veg Lo Mein Salad

Chicken Taco Salad– from Taco Night!

Taco Salad

Smoked Turkey Guacamole Rollup– with leftover toppings from tacos! (Sooo good that this one deserves its own post!)

DSC00179

Favorite snack these days… PB, Banana & Raspberry Jam Minis, w/ jumbo raisins and orange slices on the side.

PBJ and banana bites

Open-Faced Tuna Broil- For some reason lately I’ve been all about our broiler. I’ve been using it to roast veggies, potatoes, and make open-faced sandwiches like this one! Don’t ask me why I think it’s more fun to turn on the whole oven and make way more work for myself than I need to, but there’s something about watching cheese bubble up and get all gooey that just makes my heart sing! I’ve been converted. I’ve also set off the smoke alarm on about six different occasions (one of which Ben did not even notice though he was sitting in the same room…).

This one is canned tuna fish mixed with dijon mustard, spicy brown mustard, a few drops of Worchestershire sauce, garlic powder and some ground mustard (no mayo- puhleaseeee!). I also mixed in some frozen peas to give a bit more substance. Topped with spinach, tomato, pickle, more dijon, and Swiss cheese.

Anyone else see the face in this photo? I wonder how much money I could make if I told everyone it was the face of the Virgin Mary on my tuna sandwich…

tuna broil

No-Fuss Crock Pot Chicken Tacos

Happy, happy New Year! I hope you all had a fantastic holiday and a blessed time with your family and friends. I know I did! Ben and I spent a week in CT visiting my family, followed by a few days back here in Durham with his family visiting from Pittsburgh. What a blessing to be able to see both sides! It was the best of both worlds. 🙂

I have been having a blast learning more about my new camera, which Ben got me for Christmas after insisting that it was “much” too expensive. *Ahem.* Yeah right. He spoils me! It’s been so much fun playing with it, though. I got lots of shots of my parents’ new puppy, as well as many a round of Dutch Blitz by the fire. Best of all, I swear it makes my food look wayyy better than my old pics taken with my iPhone. I can’t wait to share some brand new recipes with you, just in time for 2014!

While Ben’s family was here, I tried out a new recipe for crock pot chicken tacos. It seemed like a good choice, since tacos are the kind of thing that everyone can create the way they like. There’s also something cozy about sitting around the table and constantly passing each other the topping ingredients (or at least it helps everyone work on their “please” and “thank-you”s). This was honestly one of the easiest recipes I have ever made (do I say that too much? :P), and they kept raving about it, so either they are just being extremely polite, or it really is a keeper. I like to think the latter?

Anyway, this recipe was adapted from Iowa Girl Eats, one of the regular bloggers I follow. It literally has three ingredients (a few more if you make your own seasoning) that you probably already have in your pantry! Chicken, salsa, and taco seasoning. That’s IT! Shredding the chicken and returning it to the saucy goodness of the crock pot before serving allows it to soak up all the salsa and stay nice and juicy. Because we all know there is nothing worse than dry taco meat.

I also served these with my tried-and-true Black Bean and Corn Salsa, a recipe which everyone always seems to like, and with awesome leftover potential!

DSC00144

No-Fuss Crock Pot Chicken Tacos
Recipe Type: Easy Dinners, Slow-Cooker
Cuisine: Mexican
Author: Claire McCormick of “Claire Tastes”
Prep time:
Cook time:
Total time:
Serves: 8-10
This recipe literally uses 3 ingredients! Just throw them all into the crock pot and set to low heat for 6 hours or until chicken is done, shred, and serve! So easy and soooooo good!
Ingredients
  • 6 chicken medium breasts, sliced in half
  • 1 packet low-sodium taco seasoning*
  • 24 oz. jar of mild chunky salsa
  • 10 flour tortillas
  • Toppings: shredded cheese, rice, guacamole, avocado slices, lettuce, green onions, sour cream or (plain greek yogurt), diced tomatoes, cilantro, beans, corn, extra salsa, tortilla chips… the list goes on and on! (seriously though, what DOESN’T go on tacos?)
Instructions
  1. Lightly spray bottom of crock pot with cooking spray.
  2. Carefully place halved chicken breasts in a single layer across bottom of the crock pot (if your pot is too small for a single layer like mine is, you can do two layers instead- just make sure to only use 1/2 of the taco seasoning and salsa for each layer!).
  3. Top with taco seasoning.
  4. Top with jar of salsa (yes, the WHOLE jar! trust me, it works.)
  5. Carefully lift up the chicken with a fork to allow the salsa to spread underneath a bit.
  6. Set crock pot to low heat for 4-6 hours or high for 2 hours, or until chicken is cooked through. Chicken should fall apart when you pierce it with a fork!
  7. Siesta time! After all, it IS New Year’s Day! You deserve it.
  8. When chicken is cooked through, remove from crock pot with a slotted spoon and transfer to a medium mixing bowl.
  9. Using two forks, shred chicken and return to crock pot.
  10. Mix chicken in so that it gets evenly combined with those yummy salsa juices!
  11. Set crock pot to warm until ready to serve.
  12. Meanwhile, cook rice and prepare toppings.
  13. When ready to eat, nuke tortillas for 30 sec to 1 min or until heated through. Cover with foil to keep warm.
  14. Top your tortillas with chicken and your favorite toppings (I reliably fill mine and cut ’em up, adding more lettuce, to make a big taco salad!)
  15. Serve with my “Black Bean and Corn Salsa” (https://clairetastes.com/black-bean-and-corn-salsa/)
Serving size: 1/10 recipe (w/ sour cream, cheddar cheese, tomato, and lettuce as toppings) Calories: 377 cal Fat: 12 g Carbohydrates: 33 g Fiber: 3 g Protein: 33 g
Notes
*Instead of using store-bought taco seasoning, you can easily make your own by combining 1/2 tsp garlic powder, 1 1/2 tsp cumin, 1/4 tsp onion powder, 1 1/2 tsp chili powder, 1/2 tsp paprika, 1/2 tsp each salt and pepper, and a pinch of red pepper flakes.

Oh… and I couldn’t help but to post this picture of my new chef’s jacket, given to me by Ben’s grandmother for Christmas. Don’t I look official now? Whew- Claire Tastes is in for some major improvements in 2014! I can’t wait!

DSC00124


Year-End Wrap-Up: My Favorites from 2013

As 2013 comes to an end, I thought I’d post some of my all-time favorite posts from the year. Many of you have only really gotten to know Claire Tastes within the past few months, which means that you may have missed a few of my earlier recipes. Going back to revisit some of the January and February posts is a time-warp, that’s for sure! For example, it’s hard to believe it was just a year ago that I made BBQ Chicken Pizza for the first time!

Whether a cook, blogger, or taster, I urge you- whoever you are and wherever you are- to take some time to reflect on the past year. All the triumphs, disappointments, new tastes and experiences, and memories with those you love the most. What a beautiful thing it is to be able to look back and reflect on how I have grown and just how blessed I am!

cropped-cropped-header2_12.21.13.png

And now, for the 2013 Superlatives…

Best Chicken: Lemon-Dill Chicken & Bean Bake

Best Fish: Honey Teriyaki Salmon

Best Pizza: BBQ Chicken 

Best Side: Honey Balsamic Slaw

Best Sandwich: Pesto Chicken Monte Cristos

Best Casserole: Tamale Cornbread Casserole

Best Pasta: Mediterranean Pasta Salad

Best Mexican: Chicken Taco Soup

Best Slow-Cooker Dish: Sweet Potato Black Bean Crock Pot Chili

Best Cake: Apple & Pear Harvest Crumble

Best Grab n’ Go Breakfast: Oatmeal Applesauce Raisin Muffins

Best Drink: Aeropressed Coffee

Best Chocolate: Christmas Buckeyes

Best Soup: Kale, White Bean, and Turkey Sausage Stew

Best Seasonal Dish: Pumpkin Kale Lasagna

Best DIY Gift Idea: Sugar n’ Spice Glazed Nuts

Most Versatile: “Made with Love” Quiche

Classic Chocolate & Marshmallow Fudge

Classic chocolate-marshmallow fudge… because who doesn’t love a rich, sweeter-than-sweet cube of fudge to top off Christmas dinner? This recipe just screams “glass of milk!”

[as seen in my Christmas Buckeyes photos]

Classic Chocolate & Marshmallow Fudge
Recipe Type: Dessert
Cuisine: Holiday
Author: Claire McCormick of “Claire Tastes”
Prep time:
Cook time:
Total time:
Serves: 48
This recipe was adapted from Carnation’s “Famous Fudge” recipe at verybestbaking.com.
Ingredients
  • 1 1/2 cups granulated sugar
  • 2/3 cup + 2 tbsp evaporated milk
  • 2 tbsp butter
  • 1/4 tsp salt
  • 2 1/3 cups mini marshmallows
  • 1 1/2 cups semi-sweet chocolate chips
  • 1/2 cup chopped nuts (optional)
  • 1 tsp vanilla
Instructions
  1. Line a 9×13 inch baking pan with wax paper and spray with cooking spray.
  2. Combine sugar, evaporated milk, butter, and salt in a medium saucepan.
  3. Bring to a full, rolling boil over medium heat, stirring constantly so as to avoid boiling over (mixture will foam up a LOT!)
  4. Boil, stirring constantly, for 4-5 minutes. Remove from heat.
  5. Immediately stir in marshmallows, chocolate, nuts and vanilla. Stir vigorously for 1 minute or until marshmallows and chocolate are completely melted.
  6. Pour into prepared pan. Refrigerate 2 hours or until firm.
  7. Lift from pan and remove wax paper. Cut into squares and serve.


Christmas Buckeyes

Ah, what a classic! These are my less-than-creative take on chocolate covered peanut butter balls, fondly known as “Buckeyes.” I love the sweet combination creamy peanut butter and powdered sugar, doused in smooth semi-sweet chocolate, perfect for popping in your mouth all at once (husband- style), or taking the tiniest bites imaginable, waiting for each one to melt in your mouth (Claire- style). But really- any way you eat them, these are sure to please any mouth. Granted you like peanut butter. And chocolate. And peanut butter chocolate things. But honestly, who doesn’t? Are those like people who actually prefer unfrosted pop-tarts? Am I friends with any of these people? I surely hope not.

But I digress. This recipe can be adjusted SO easily to make it more or less sweet, evidenced by the dozens of completely different recipes you find online when you google “Buckeyes.” Um, can you say “slightly overwhelming”? I’ve found recipes that call for paraffin wax, recipes that use two cups of sugar, recipes that use SIX cups (yikes! my dentist would kill me with his drill!), recipes using chunky PB, and recipes that add crushed graham crackers to the mix to make it less of an “I-can-only-take-one-bite-of-these-and-then-I’m-done-because-this-is-too. darn. sweet” experience. This is really just the most basic version of the classic that I could find, so feel free to take some creative license and find out what works for you and your loved ones!

Have a very merry, peanut butter ball-dipping, Christmas!

*For the chocolate fudge recipe seen in these photos, click here.

photo 4 (30)

Christmas Buckeyes
Author: Claire McCormick of “Claire Tastes”
Prep time:
Cook time:
Total time:
Serves: 40
“Chocolate and peanut butter combos are gross!” said no one EVER.
Ingredients
  • 1 1/2 cups creamy peanut butter
  • 1/2 cup (1 stick) butter, softened (not melted!)
  • 4 cups confectioner’s sugar, sifted
  • 1 tsp vanilla
  • 6 oz semi-sweet chocolate chips
  • 2 tbsp shortening
  • toothpicks
  • wax paper
Instructions
  1. Line a baking sheet with wax paper and set aside.
  2. In a large bowl, beat peanut butter, butter, and vanilla on medium speed until no chunks of butter are left.
  3. Add confectioner’s sugar cup by cup, reducing mixing speed to low. The dough should turn into fine crumbs. Turn the mixer off.
  4. Get in there with your hands! The dough needs to be more packed together than a mixer can do, so you need to roll up those sleeves, remove that Pandora charm bracelet (am I the only one who thinks those things look like a kindergartener’s craft project?), and knead that dough into one big lump!
  5. Roll into 3/4″ balls and place on wax paper-lined baking sheet. Insert toothpick into each ball.
  6. Stick in the freezer for at least 30 minutes or until the peanut butter is firm.
  7. Melt chocolate and shortening in a glass bowl over a saucepan filled about 2″ boiling water. When peanut butter balls are set, use the toothpicks to dip each one into the chocolate, swirling to evenly coat the bottom and sides of each
  8. Replace on waxed baking sheet.
  9. Return to freezer (or refrigerator) and chill until chocolate is set, at least 30 mins.
  10. Remove toothpicks and serve with a big glass of milk!

photo 1 (65)

photo 5 (14)